
آموزش اتصال رویداد در انگولار 6
آموزش اتصال رویداد در انگولار 6
در این درس از مجموعه آموزش برنامه نویسی سایت سورس باران، به آموزش اتصال رویداد در انگولار 6 خواهیم پرداخت.
هنگامی که یک کاربر با یک برنامه کاربردی به شکل حرکت صفحه کلید، کلیک ماوس یا یک ماوس تعامل برقرار می کند، یک رویداد ایجاد می کند. این رویدادها باید برای انجام نوعی عمل مدیریت شوند. این جایی است که رویداد binding به تصویر کشیده می شود.
برای درک بهتر این موضوع مثالی را در نظر می گیریم.
app.component.html
|
1 2 3 4 5 6 7 8 9 10 11 12 13 14 15 16 17 18 19 20 21 22 |
<!--The content below is only a placeholder and can be replaced.--> <div style = "text-align:center"> <h1> Welcome to {{title}}. </h1> </div> <div> Months : <select> <option *ngFor = "let i of months">{{i}}</option> </select> </div> <br/> <div> <span *ngIf = "isavailable; then condition1 else condition2"> Condition is valid. </span> <ng-template #condition1>Condition is valid</ng-template> <ng-template #condition2>Condition is invalid</ng-template> </div> <button (click)="myClickFunction($event)"> Click Me </button> |
در فایل app.component.html یک دکمه تعریف کرده ایم و با استفاده از رویداد کلیک یک تابع به آن اضافه کرده ایم.
در زیر سینتکس برای تعریف یک دکمه و افزودن یک تابع به آن آمده است.
|
1 |
(click)="myClickFunction($event)" |
تابع در فایل ts تعریف شده است: app.component.ts
|
1 2 3 4 5 6 7 8 9 10 11 12 13 14 15 16 17 18 19 |
import { Component } from '@angular/core'; @Component({ selector: 'app-root', templateUrl: './app.component.html', styleUrls: ['./app.component.css'] }) export class AppComponent { title = 'Angular 6 Project!'; //array of months. months = ["January", "Feburary", "March", "April", "May", "June", "July", "August", "September", "October", "November", "December"]; isavailable = true; myClickFunction(event) { //just added console.log which will display the event details in browser on click of the button. alert("Button is clicked"); console.log(event); } } |
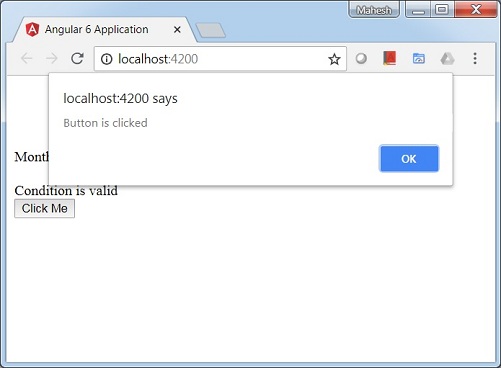
با کلیک بر روی دکمه، کنترل به تابع myClickFunction میآید و کادر محاورهای ظاهر میشود که نشان میدهد روی دکمه کلیک شده است، همانطور که در تصویر زیر نشان داده شده است –
اجازه دهید اکنون رویداد تغییر را به منوی کشویی اضافه کنیم.
خط کد زیر به شما کمک میکند رویداد تغییر را به فهرست کشویی اضافه کنید
|
1 2 3 4 5 6 7 8 9 10 11 12 13 14 15 16 17 18 19 20 |
<!--The content below is only a placeholder and can be replaced.--> <div style = "text-align:center"> <h1> Welcome to {{title}}. </h1> </div> <div> Months : <select (change) = "changemonths($event)"> <option *ngFor = "let i of months">{{i}}</option> </select> </div> <br/> <div> <span *ngIf = "isavailable; then condition1 else condition2"> Condition is valid. </span> <ng-template #condition1>Condition is valid</ng-template> <ng-template #condition2>Condition is invalid</ng-template> </div> <button (click) = "myClickFunction($event)">Click Me</button> |
این تابع در فایل app.component.ts – اعلام شده است
|
1 2 3 4 5 6 7 8 9 10 11 12 13 14 15 16 17 18 19 20 21 22 |
import { Component } from '@angular/core'; @Component({ selector: 'app-root', templateUrl: './app.component.html', styleUrls: ['./app.component.css'] }) export class AppComponent { title = 'Angular 6 Project!'; //array of months. months = ["January", "Feburary", "March", "April", "May", "June", "July", "August", "September", "October", "November", "December"]; isavailable = true; myClickFunction(event) { alert("Button is clicked"); console.log(event); } changemonths(event) { console.log("Changed month from the Dropdown"); console.log(event); } } |
پیام کنسول “Changed month from the Dropdown” در کنسول همراه با رویداد نمایش داده می شود.
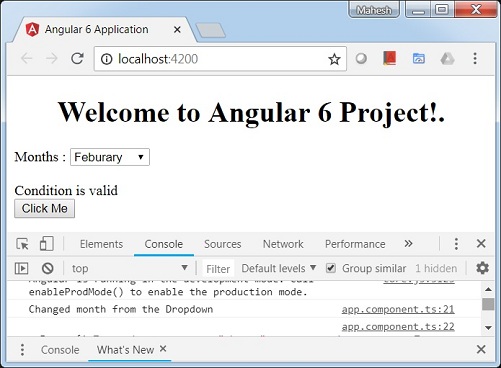
اجازه دهید هنگامی که مقدار کشویی مطابق شکل زیر تغییر می کند، یک پیام هشدار در app.component.ts اضافه کنیم.
|
1 2 3 4 5 6 7 8 9 10 11 12 13 14 15 16 17 18 19 20 21 22 23 24 |
import { Component } from '@angular/core'; @Component({ selector: 'app-root', templateUrl: './app.component.html', styleUrls: ['./app.component.css'] }) export class AppComponent { title = 'Angular 6 Project!'; //array of months. months = ["January", "February", "March", "April", "May", "June", "July", "August", "September", "October", "November", "December"]; isavailable = true; myClickFunction(event) { //just added console.log which will display the event details in browser on click of the button. alert("Button is clicked"); console.log(event); } changemonths(event) { alert("Changed month from the Dropdown"); } } |
هنگامی که مقدار در کرکره تغییر کرد، یک کادر محاوره ای ظاهر می شود و پیام زیر نمایش داده می شود – “Changed month from the Dropdown“.


.svg)
دیدگاه شما