
آموزش طرح بندی در برنامه نویسی زامارین
آموزش طرح بندی در برنامه نویسی زامارین
در این درس از آموزش های برنامه نویسی سایت سورس باران، با آموزش طرح بندی در برنامه نویسی زامارین در خدمت شما هستیم.
طرح بندی خطی
در طرح خطی ، مطالب به صورت افقی یا عمودی مرتب می شوند.
طرح بندی خطی ─ افقی
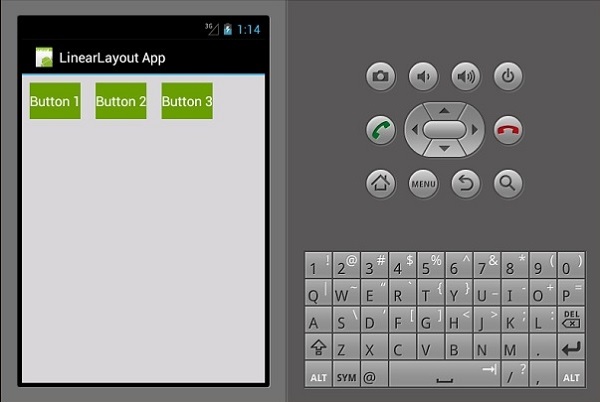
محتوای این طرح بندی به صورت افقی مرتب شده است. برای این نسخه ی نمایشی، ما می خواهیم 3 دکمه ایجاد کنیم و آنها را به صورت افقی در یک طرح بندی خطی مرتب کنیم.
|
1 2 3 4 5 6 7 8 9 10 11 12 13 14 15 16 17 18 19 20 21 22 23 24 25 26 27 28 29 30 |
<?xml version = "1.0" encoding = "utf-8"?> <LinearLayout xmlns:android = "http://schemas.android.com/apk/res/android" android:orientation = "horizontal" android:layout_width = "fill_parent" android:layout_height = "fill_parent" android:background = "#d3d3d3" android:minWidth="25px" android:minHeight="25px"> <Button android:id="@+id/MyButton1" android:layout_width="wrap_content" android:layout_margin="10dp" android:layout_height="wrap_content" android:text="Button 1" android:background="@android:color/holo_green_dark" /> <Button android:id="@+id/MyButton2" android:layout_width="wrap_content" android:layout_margin="10dp" android:layout_height="wrap_content" android:text="Button 2" android:background="@android:color/holo_green_dark" /> <Button android:id="@+id/MyButton3" android:layout_width="wrap_content" android:layout_margin="10dp" android:layout_height="wrap_content" android:text="Button 3" android:background="@android:color/holo_green_dark" /> </LinearLayout> |
خروجی مورد انتظار:
طرح بندی خطی _ عمودی
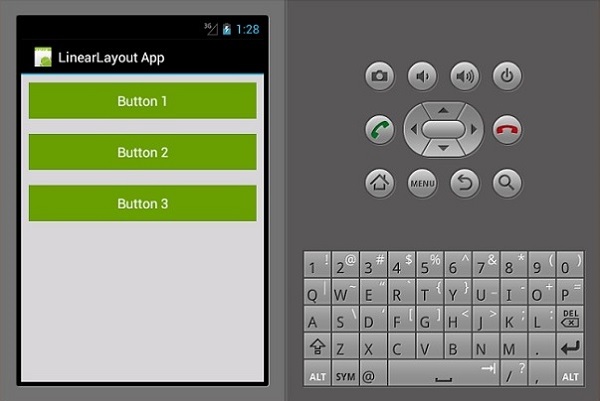
این نوع طرح بندی، child view را به صورت عمودی قرار می دهد.
|
1 2 3 4 5 6 7 8 9 10 11 12 13 14 15 16 17 18 19 20 21 22 23 24 25 26 27 28 29 30 |
<?xml version = "1.0" encoding = "utf-8"?> <LinearLayout xmlns:android = "http://schemas.android.com/apk/res/android" android:orientation = "vertical" android:layout_width = "fill_parent" android:layout_height = "fill_parent" android:background = "#d3d3d3" android:minWidth = "25px" android:minHeight = "25px"> <Button android:id = "@+id/MyButton1" android:layout_width = "fill_parent" android:layout_margin = "10dp" android:layout_height = "wrap_content" android:text = "Button 1" android:background = "@android:color/holo_green_dark" /> <Button android:id = "@+id/MyButton2" android:layout_width = "fill_parent" android:layout_margin = "10dp" android:layout_height = "wrap_content" android:text = "Button 2" android:background = "@android:color/holo_green_dark" /> <Button android:id = "@+id/MyButton3" android:layout_width = "fill_parent" android:layout_margin = "10dp" android:layout_height = "wrap_content" android:text="Button 3" android:background = "@android:color/holo_green_dark" /> </LinearLayout> |
خروجی مورد انتظار:
طرح بندی نسبی
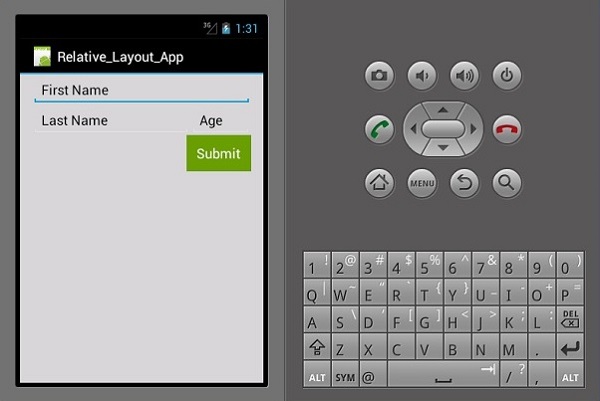
در این view موقعیت دیدگاه کودک نسبت به والدین یا خواهر و برادرش نسبت دارد. در مثال زیر، ما می خواهیم 3 EditText ،view و یک دکمه ایجاد کنیم و سپس آنها را به صورت نسبی تراز کنیم.
یک پروژه جدید ایجاد کنید و آن را relative layout app بنامید. main.axml را باز کرده و کد زیر را اضافه کنید.
|
1 2 3 4 5 6 7 8 9 10 11 12 13 14 15 16 17 18 19 20 21 22 23 24 25 26 27 28 29 30 31 32 33 34 35 36 37 38 39 40 41 |
<?xml version = "1.0" encoding = "utf-8"?> <RelativeLayout xmlns:android = "http://schemas.android.com/apk/res/android" android:layout_width = "match_parent" android:layout_height = "match_parent" android:paddingLeft = "16dp" android:background = "#d3d3d3" android:paddingRight = "16dp"> <EditText android:id = "@+id/name" android:layout_width = "match_parent" android:layout_height = "wrap_content" android:hint = "First Name" android:textColorHint = "@android:color/background_dark" android:textColor = "@android:color/background_dark" /> <EditText android:id = "@+id/lastName" android:layout_width = "0dp" android:layout_height = "wrap_content" android:hint = "Last Name" android:layout_below = "@id/name" android:textColorHint = "@android:color/background_dark" android:textColor = "@android:color/background_dark" android:layout_alignParentLeft = "true" android:layout_toLeftOf = "@+id/age" /> <EditText android:id = "@id/age" android:layout_width = "80dp" android:layout_height = "wrap_content" android:layout_below = "@id/name" android:hint = "Age" android:textColorHint = "@android:color/background_dark" android:textColor = "@android:color/background_dark" android:layout_alignParentRight = "true" /> <Button android:layout_width = "85dp" android:layout_height = "wrap_content" android:layout_below = "@id/age" android:layout_alignParentRight = "true" android:text = "Submit" android:background = "@android:color/holo_green_dark" /> </RelativeLayout> |
پارامترهای مهمی که ما در این کد استفاده کرده ایم عبارتند از:
- android: layout_below – عنصر view کودک را در زیر والد خود تراز می کند.
- android: layout_alignParentLeft – عنصر والد را به سمت چپ تراز می کند.
- android: layout_toLeftOf – این ویژگی یک عنصر را در سمت چپ عنصر دیگری تراز می کند.
- android: layout_alignParentRight – والدین را به راست تراز می کند.
بعد از ساخت و اچرای برنامه، خروچی به صورت زیر می باشد.
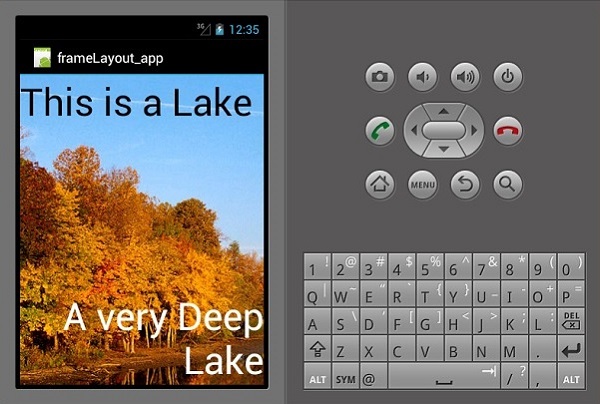
طرح بندی فریم
از طرحب بندی فریم برای نمایش فقط یک مورد استفاده می شود. طرح بندی چندین آیتم در این طرح بندی بدون همپوشانی آنها کار دشواری است.
یک پروژه جدید را شروع کنید و آن را frameLayoutApp بنامید. همانطور که در زیر نشان داده شده ، یک طرح بندی جدید Frame ایجاد کنید.
|
1 2 3 4 5 6 7 8 9 10 11 12 13 14 15 16 17 18 19 20 21 22 23 24 25 |
<?xml version = "1.0" encoding = "utf-8"?> <FrameLayout xmlns:android = "http://schemas.android.com/apk/res/android" android:layout_width = "fill_parent" android:layout_height = "fill_parent"> <ImageView android:id = "@+id/ImageView1" android:scaleType = "matrix" android:layout_height = "fill_parent" android:layout_width = "fill_parent" android:src = "@drawable/img1" /> <TextView android:layout_width = "fill_parent" android:layout_height = "wrap_content" android:textSize = "50dp" android:textColor = "#000" android:text = "This is a Lake" /> <TextView android:gravity = "right" android:layout_width = "fill_parent" android:layout_height = "wrap_content" android:textSize = "50dp" android:text = "A very Deep Lake" android:layout_gravity = "bottom" android:textColor = "#fff" /> </FrameLayout> |
کد فوق یک imageView ایجاد می کند که کل صفحه را پر می کند. سپس دو textviews در بالای imageView شناور هستند.
بعد از ساخت و اچرای برنامه، خروچی به صورت زیر می باشد.
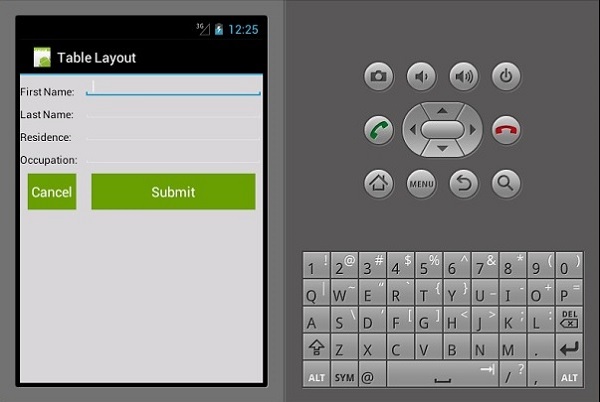
طرح بندی جدول
در این طرح بندی view به صورت ردیف و ستون قرار گرفته است. بیایید ببینیم چگونه کار می کند
|
1 2 3 4 5 6 7 8 9 10 11 12 13 14 15 16 17 18 19 20 21 22 23 24 25 26 27 28 29 30 31 32 33 34 35 36 37 38 39 40 41 42 43 44 45 46 47 48 49 50 51 52 53 54 55 56 57 58 59 60 61 62 63 64 65 66 67 68 69 70 71 72 73 74 75 |
<?xml version = "1.0" encoding = "utf-8"?> <TableLayout xmlns:android = "http://schemas.android.com/apk/res/android" android:layout_width = "fill_parent" android:background = "#d3d3d3" android:layout_height = "fill_parent" android:stretchColumns = "1"> <TableRow> <TextView android:text = "First Name:" android:layout_width = "wrap_content" android:layout_height = "wrap_content" android:textColor = "@android:color/black" /> <EditText android:width = "100px" android:layout_width = "fill_parent" android:layout_height = "30dp" android:textColor = "@android:color/black" /> </TableRow> <TableRow> <TextView android:text = "Last Name:" android:layout_width = "wrap_content" android:layout_height = "wrap_content" android:textColor = "@android:color/black" /> <EditText android:width = "50px" android:layout_width = "fill_parent" android:layout_height = "30dp" android:textColor = "@android:color/black" /> </TableRow> <TableRow> <TextView android:text = "Residence:" android:layout_width = "wrap_content" android:layout_height = "wrap_content" android:textColor = "@android:color/black" /> <EditText android:width = "100px" android:layout_width = "fill_parent" android:layout_height = "30dp" android:textColor = "@android:color/black" /> </TableRow> <TableRow> <TextView android:text = "Occupation:" android:layout_width = "wrap_content" android:layout_height = "wrap_content" android:textColor = "@android:color/black" /> <EditText android:width = "100px" android:layout_width = "fill_parent" android:layout_height = "30dp" android:textColor = "@android:color/black" /> </TableRow> <TableRow> <Button android:text = "Cancel" android:layout_width = "wrap_content" android:layout_margin = "10dp" android:layout_height = "wrap_content" android:background = "@android:color/holo_green_dark" /> <Button android:text = "Submit" android:width = "100px" android:layout_margin = "10dp" android:layout_width = "wrap_content" android:layout_height = "wrap_content" android:background = "@android:color/holo_green_dark" /> </TableRow> </TableLayout> |
خروجی
لیست جلسات قبل آموزش برنامه نویسی زامارین
- آموزش برنامه نویسی زامارین (Xamarin)
- آموزش نصب زامارین
- نوشتن اولین برنامه در برنامه نویسی زامارین
- آموزش فایل مانیفست در برنامه نویسی زامارین
- منابع اندروید در برنامه نویسی زامارین
- چرخه فعالیت اندروید در برنامه نویسی زامارین
- مجوزها در برنامه نویسی زامارین
- آموزش ساخت برنامه رابط کاربری گرافیکی در برنامه نویسی زامارین
- آموزش منوها در برنامه نویسی زامارین


.svg)
دیدگاه شما