
آموزش لیست ویو در برنامه نویسی React Native
در خدمت شما عزیزان هستیم با آموزش لیست ویو در برنامه نویسی React Native از وب سایت آموزش برنامه نویسی سورس باران. در جلسه هشتم آموزش ریکت نیتیو،لیست ویو (ListView) یکی از قدیمی ترین و پرکاربردترین کامپوننت ها در توسعه اپلیکیشن های Android و Ios است. لیست ویو ساده ترین راه برای نمایش داده های چندگانه در یک صفحه نمایش با قابلیت scroll است. تا نتها با ما همراه باشید…
آموزش لیست ویو در برنامه نویسی React Native
بدون معطلی بریم سراغ آموزش و کارمون رو شروع کنیم. ابتدا یک پروژه جدید ایجاد کنید. ما List را در کامپوننت Home وارد می کنیم و آن را روی صفحه نمایش نشان می دهیم.
App.js
|
1 2 3 4 5 6 7 8 9 |
import React from 'react' import List from './List.js' const App = () => { return ( <List /> ) } export default App |
List.js
|
1 2 3 4 5 6 7 8 9 10 11 12 13 14 15 16 17 18 19 20 21 22 23 24 25 26 27 28 29 30 31 32 33 34 35 36 37 38 39 40 41 42 43 44 45 46 47 48 49 50 51 52 53 54 55 56 57 58 59 |
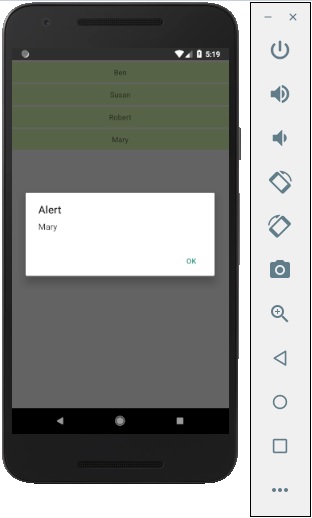
import React, { Component } from 'react' import { Text, View, TouchableOpacity, StyleSheet } from 'react-native' class List extends Component { state = { names: [ { id: 0, name: 'Ben', }, { id: 1, name: 'Susan', }, { id: 2, name: 'Robert', }, { id: 3, name: 'Mary', } ] } alertItemName = (item) => { alert(item.name) } render() { return ( <View> { this.state.names.map((item, index) => ( <TouchableOpacity key = {item.id} style = {styles.container} onPress = {() => this.alertItemName(item)}> <Text style = {styles.text}> {item.name} </Text> </TouchableOpacity> )) } </View> ) } } export default List const styles = StyleSheet.create ({ container: { padding: 10, marginTop: 3, backgroundColor: '#d9f9b1', alignItems: 'center', }, text: { color: '#4f603c' } }) |
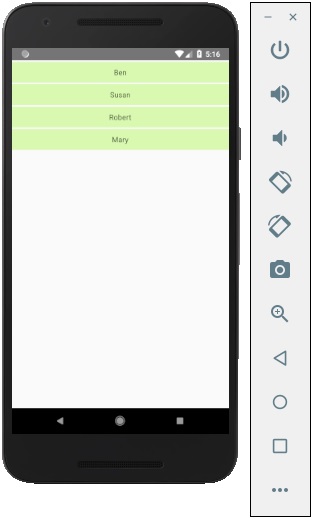
شما می توانید بر روی هر یک از آیتم های موجود در لیست کلیک کنید تا هشدار را با نام نشان دهد.
مثال 2 از آموزش ListView در react native
ساخت پروژه جدید و اضافه کردن کامپوننت های AppRegistry, StyleSheet, View, Alert, ListView , Text در بلاک import
|
1 2 3 |
import React, { Component } from 'react'; import { AppRegistry, StyleSheet, View, Alert, ListView, Text } from 'react-native'; |
ایجاد constructor در کلاس اصلی با پارامتر props
|
1 2 3 4 5 6 7 8 9 10 11 12 13 14 15 16 17 18 19 20 21 22 23 24 25 26 |
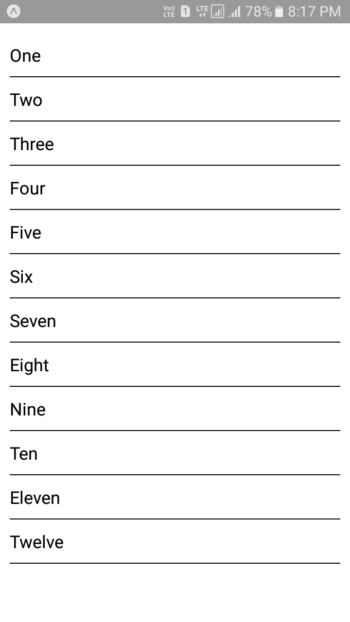
constructor(props) { super(props); const ds = new ListView.DataSource({rowHasChanged: (r1, r2) => r1 !== r2}); this.state = { dataSource: ds.cloneWithRows([ 'One', 'Two', 'Three', 'Four', 'Five', 'Six', 'Seven', 'Eight', 'Nine', 'Ten', 'Eleven', 'Twelve' ]), }; } |
ایجاد یک تابع به نام ListViewItemSeparator . با استفاده از این تابع بین آیتم های ListView یک جداکننده بصورت خط ایجاد میکنیم.
|
1 2 3 4 5 6 7 8 9 10 11 |
ListViewItemSeparator = () => { return ( <View style={{ height: .5, width: "100%", backgroundColor: "#000", }} /> ); } |
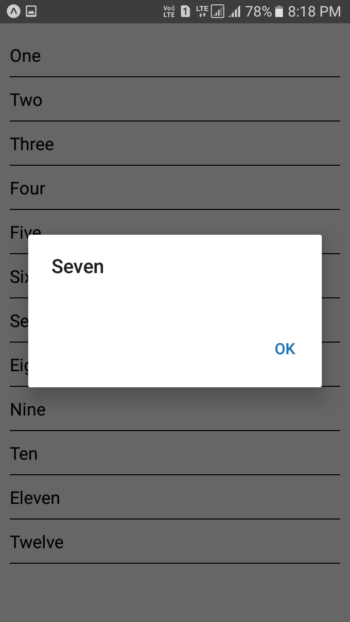
ایجاد تابع GetListViewItem برای نمایش نام آیتم های ListView
|
1 2 3 4 5 |
GetListViewItem (rowData) { Alert.alert(rowData); } |
اضافه کردن View در بلاک render return
|
1 2 3 4 5 6 7 8 9 10 |
render() { return ( <View> </View> ); } |
ایجاد StyleSheet در بالای خط کد AppRegistry.registerComponent
|
1 2 3 4 5 6 7 8 9 10 11 12 13 14 15 16 17 18 19 |
const styles = StyleSheet.create({ MainContainer :{ justifyContent: 'center', flex:1, margin: 10 }, rowViewContainer: { fontSize: 18, paddingRight: 10, paddingTop: 10, paddingBottom: 10, } }); |
اضافه کردن کامپوننت ListView دورن View
dataSource: فراخوانی data source که با استفاده از state تعریف کردیم.
renderSeparator: فراخوانی تابع ListViewItemSeparator برای نمایش خط جداکننده بین آیتم ها
renderRow: نمایش اطلاعات با استفاده از کامپوننت Text
onPress: فراخوانی تابع GetListViewItem
|
1 2 3 4 5 6 7 8 9 10 11 12 13 14 15 |
<View style={styles.MainContainer}> <ListView dataSource={this.state.dataSource} renderSeparator= {this.ListViewItemSeparator} renderRow={ (rowData) => <Text style={styles.rowViewContainer} onPress={this.GetListViewItem.bind(this, rowData)}>{rowData}</Text> } /> </View> |
کد کامل برنامه در فایل index.js
|
1 2 3 4 5 6 7 8 9 10 11 12 13 14 15 16 17 18 19 20 21 22 23 24 25 26 27 28 29 30 31 32 33 34 35 36 37 38 39 40 41 42 43 44 45 46 47 48 49 50 51 52 53 54 55 56 57 58 59 60 61 62 63 64 65 66 67 68 69 70 71 72 73 74 75 76 77 78 79 80 81 82 83 84 85 86 87 88 89 90 91 92 93 94 95 96 |
import React, { Component } from 'react'; import { AppRegistry, StyleSheet, View, Alert, ListView, Text } from 'react-native'; class MainProject extends Component { constructor(props) { super(props); const ds = new ListView.DataSource({rowHasChanged: (r1, r2) => r1 !== r2}); this.state = { dataSource: ds.cloneWithRows([ 'One', 'Two', 'Three', 'Four', 'Five', 'Six', 'Seven', 'Eight', 'Nine', 'Ten', 'Eleven', 'Twelve' ]), }; } ListViewItemSeparator = () => { return ( <View style={{ height: .5, width: "100%", backgroundColor: "#000", }} /> ); } GetListViewItem (rowData) { Alert.alert(rowData); } render() { return ( <View style={styles.MainContainer}> <ListView dataSource={this.state.dataSource} renderSeparator= {this.ListViewItemSeparator} renderRow={ (rowData) => <Text style={styles.rowViewContainer} onPress={this.GetListViewItem.bind(this, rowData)}>{rowData}</Text> } /> </View> ); } } const styles = StyleSheet.create({ MainContainer :{ justifyContent: 'center', flex:1, margin: 10 }, rowViewContainer: { fontSize: 18, paddingRight: 10, paddingTop: 10, paddingBottom: 10, } }); AppRegistry.registerComponent('MainProject', () => MainProject); |
ممنون از اینکه ما رو تا انتهای آموزش ListView در برنامه نویسی React Native همراهی نمودید. لیست جلسات قبل رو میتونید در زیر مشاهده نمایید.
لیست جلسات قبل آموزش React Native
راستی! برای دریافت مطالب جدید در کانال تلگرام یا پیج اینستاگرام سورس باران عضو شوید.
- منبع : سورس باران
- رمز فايل : www.sourcebaran.com
- انتشار: 1 می 2020
دسته بندی موضوعات
- آموزش ارز دیجیتال
- آموزش برنامه نویسی
- آموزش متنی برنامه نویسی
- اطلاعیه و سایر مطالب
- پروژه برنامه نویسی
- دوره های تخصصی برنامه نویسی
- رپورتاژ
- فیلم های آموزشی
- ++C
- ADO.NET
- Adobe Flash
- Ajax
- AngularJS
- apache
- ARM
- Asp.Net
- ASP.NET MVC
- AVR
- Bootstrap
- CCNA
- CCNP
- CMD
- CSS
- Dreameaver
- EntityFramework
- HTML
- IOS
- jquery
- Linq
- Mysql
- Oracle
- PHP
- PHPMyAdmin
- Rational Rose
- silver light
- SQL Server
- Stimulsoft Reports
- Telerik
- UML
- VB.NET&VB6
- WPF
- Xml
- آموزش های پروژه محور
- اتوکد
- الگوریتم تقریبی
- امنیت
- اندروید
- اندروید استودیو
- بک ترک
- بیسیک فور اندروید
- پایتون
- جاوا
- جاوا اسکریپت
- جوملا
- دلفی
- دوره آموزش Go
- دوره های رایگان پیشنهادی
- زامارین
- سئو
- ساخت CMS
- سی شارپ
- شبکه و مجازی سازی
- طراحی الگوریتم
- طراحی بازی
- طراحی وب
- فتوشاپ
- فریم ورک codeigniter
- فلاتر
- کانستراکت
- کریستال ریپورت
- لاراول
- معماری کامپیوتر
- مهندسی اینترنت
- هوش مصنوعی
- یونیتی
- کتاب های آموزشی
- Android
- ASP.NET
- AVR
- LINQ
- php
- Workflow
- اچ تی ام ال
- بانک اطلاعاتی
- برنامه نویسی سوکت
- برنامه نویسی موبایل
- پاسکال
- پایان نامه
- پایتون
- جاوا
- جاوا اسکریپت
- جی کوئری
- داده کاوی
- دلفی
- رباتیک
- سئو
- سایر کتاب ها
- سخت افزار
- سی اس اس
- سی پلاس پلاس
- سی شارپ
- طراحی الگوریتم
- فتوشاپ
- مقاله
- مهندسی نرم افزار
- هک و امنیت
- هوش مصنوعی
- ویژوال بیسیک
- نرم افزار و ابزار برنامه نویسی
- وردپرس