
آموزش کار با TextInput در برنامه نویسی ریکت نیتیو
در خدمت شما هستیم با آموزش کار با TextInput در برنامه نویسی ریکت نیتیو از وب سایت آموزش برنامه نویسی سورس باران. در جلسه نهم آموزش ریکت نیتیو یاد میگیرید که چطور مقدار TextInput در ریکت نیتیو رو بگیرید و مقدار ورودی کاربر رو در قالب Alert Dialog نمایش بدید. TextInput برای بدست آوردن Value از کاربر در ReactNative استفاده میشود.
با استفاده از این مثال افرادی که تازه شروع به یادگیری ReactNative کرده اند به راحتی میتوانند کار با Stateها و Propsها رو یاد بگیرند. با ما همراه باشید…
آموزش کار با TextInput در ریکت نیتیو
کامپوننت Home ورودی ها را import کرده و رندر می کند.
|
1 2 3 4 5 6 7 8 9 |
import React from 'react'; import Inputs from './inputs.js' const App = () => { return ( <Inputs /> ) } export default App |
ورودی ها در ریکت نیتیو
ما initial state را تعریف خواهیم کرد. پس از تعریف initial state ،ما handleEmail و توابع handlePassword را ایجاد خواهیم کرد. این توابع برای به روز رسانی وضعیت یا state استفاده می شود. تابع ()login فقط مقدار وضعیت کنونی را اعلام می کند. ما همچنین برخی از خواص دیگر را به ورودی های متن اضافه می کنیم تا نوشتن با حروف بزرگ به صورت خودکار غیرفعال شود، حاشیه پایین را در دستگاه های Android حذف کنیم و یک placeholder جایگزین کنیم.
|
1 2 3 4 5 6 7 8 9 10 11 12 13 14 15 16 17 18 19 20 21 22 23 24 25 26 27 28 29 30 31 32 33 34 35 36 37 38 39 40 41 42 43 44 45 46 47 48 49 50 51 52 53 54 55 56 57 58 59 60 61 62 63 64 65 66 67 |
import React, { Component } from 'react' import { View, Text, TouchableOpacity, TextInput, StyleSheet } from 'react-native' class Inputs extends Component { state = { email: '', password: '' } handleEmail = (text) => { this.setState({ email: text }) } handlePassword = (text) => { this.setState({ password: text }) } login = (email, pass) => { alert('email: ' + email + ' password: ' + pass) } render() { return ( <View style = {styles.container}> <TextInput style = {styles.input} underlineColorAndroid = "transparent" placeholder = "Email" placeholderTextColor = "#9a73ef" autoCapitalize = "none" onChangeText = {this.handleEmail}/> <TextInput style = {styles.input} underlineColorAndroid = "transparent" placeholder = "Password" placeholderTextColor = "#9a73ef" autoCapitalize = "none" onChangeText = {this.handlePassword}/> <TouchableOpacity style = {styles.submitButton} onPress = { () => this.login(this.state.email, this.state.password) }> <Text style = {styles.submitButtonText}> Submit </Text> </TouchableOpacity> </View> ) } } export default Inputs const styles = StyleSheet.create({ container: { paddingTop: 23 }, input: { margin: 15, height: 40, borderColor: '#7a42f4', borderWidth: 1 }, submitButton: { backgroundColor: '#7a42f4', padding: 10, margin: 15, height: 40, }, submitButtonText:{ color: 'white' } }) |
هر بار که ما در یکی از فیلد های ورودی تایپ می کنیم، وضعیت به روز می شود. هنگامی که ما بر روی دکمه Submit کلیک می کنیم، متن از ورودی ها در داخل جعبه محاوره نمایش داده خواهد شد.
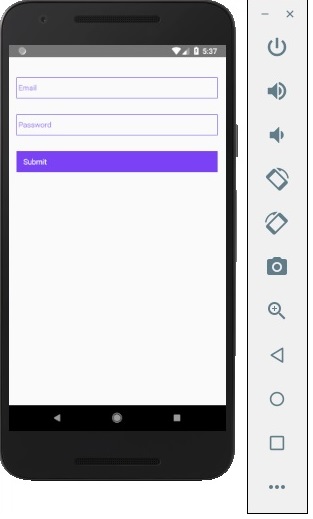
هر بار که ما در یکی از فیلدهای ورودی تایپ می کنیم، وضعیت به روز می شود. هنگامی که ما بر روی دکمه Submit کلیک می کنیم، متن از ورودی ها در داخل جعبه محاوره نمایش داده خواهد شد.

آموزش 2 کار با TextInput در برنامه نویسی ریکت نیتیو
ابتدا یک پروژه جدید ایجاد نمایید. سپس AppRegistry, StyleSheet, ScrollView, TextInput, View, Alert,Button را در بلاک import اضافه کنید.
|
1 |
import { AppRegistry, StyleSheet, TextInput, View, Alert, Button } from 'react-native'; |
ایجاد Constructor در کلاس اصلی با پارامتر props
|
1 2 3 4 5 |
constructor(props) { } |
اضافه کردن متد super درون Constructor با پارامتر props
|
1 2 3 4 5 6 7 |
constructor(props) { super(props) } |
.اضافه کردن this.state در Constructor و قرار دادن ‘ ‘= TextInputValueHolder بدون هیچ مقداری.برای کنترل داده هایی که در حال تغییر هستند در اپلیکیشن های ReactNative از state استفاده میکنیم.
|
1 2 3 4 5 6 7 8 9 10 11 |
constructor(props) { super(props) this.state = { TextInputValueHolder: '' } } |
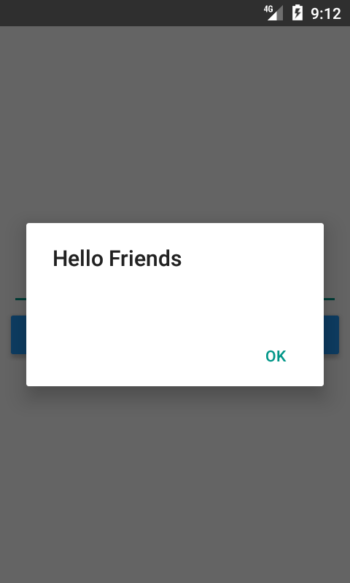
ایجاد یک تابع به نام GetValueFunction . دراین تابع ما یک متغیر از نوع const به نام TextInputValueHolder ایجاد میکنیم و مقدارش رو برابر با this.state خودش قرار میدیم.بعد از گرفتن مقدار متغیر ما این مقدار رو در قالب یک Alert Dialog نمایش میدیم.
|
1 2 3 4 5 6 7 |
GetValueFunction = () =>{ const { TextInputValueHolder } = this.state ; Alert.alert(TextInputValueHolder) } |
اضافه کردن کامپوننت View در بلاک render return
|
1 2 3 4 5 6 7 8 9 10 11 |
render() { return ( <View> </View> ); } |
ایجاد StyleSheet در بالای خط کد AppRegistry.registerComponent و ایجاد یک استایل اختصاصی به نام MainContainer
|
1 2 3 4 5 6 7 8 9 10 |
const styles = StyleSheet.create({ MainContainer :{ justifyContent: 'center', flex:1, margin: 10 } }); |
استفاده از استایل MainContainer در View
|
1 2 3 4 5 6 7 8 9 10 |
render() { return ( <View style={styles.MainContainer}> </View> ); } |
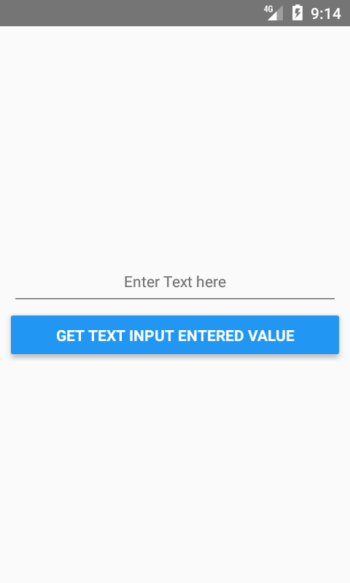
اضافه کردن کامپوننت TextInputدرون View.متد onChangeText مقدار state رو هر بار که کاربر چیزی را تایپ میکند،بروزرسانی میکند و با استفاده از inline style ما text alignment رو مرکز در نظر گرفته ایم و ارتفاع TextInput رو 50 مشخص کرده ایم.
|
1 2 3 4 5 6 7 8 9 10 11 12 13 |
<View style={styles.MainContainer}> <TextInput // Adding hint in Text Input using Place holder. placeholder="Enter Text here" onChangeText={TextInputValueHolder => this.setState({TextInputValueHolder})} style={{textAlign: 'center', marginBottom: 7, height: 50}} /> </View> |
اضافه کردن کامپوننت Button درون View درست زیر کامپوننت TextInput و فراخوانی تابع GetValueFunction در onPress of button.
|
1 2 3 4 5 6 7 8 9 10 11 12 13 14 15 16 17 |
<View style={styles.MainContainer}> <TextInput // Adding hint in Text Input using Place holder. placeholder="Enter Text here" onChangeText={TextInputValueHolder => this.setState({TextInputValueHolder})} style={{textAlign: 'center', marginBottom: 7, height: 50}} /> <Button title="Get Text Input Entered Value" onPress={this.GetValueFunction} color="#2196F3" /> </View> |
کد کامل برنامه در فایل index.js
|
1 2 3 4 5 6 7 8 9 10 11 12 13 14 15 16 17 18 19 20 21 22 23 24 25 26 27 28 29 30 31 32 33 34 35 36 37 38 39 40 41 42 43 44 45 46 47 48 49 50 51 52 53 54 55 56 57 58 59 60 61 62 63 |
import React, { Component } from 'react'; import { AppRegistry, StyleSheet, TextInput, View, Alert, Button } from 'react-native'; class Myproject extends Component { constructor(props) { super(props) this.state = { TextInputValueHolder: '' } } GetValueFunction = () =>{ const { TextInputValueHolder } = this.state ; Alert.alert(TextInputValueHolder) } render() { return ( <View style={styles.MainContainer}> <TextInput // Adding hint in Text Input using Place holder. placeholder="Enter Text here" onChangeText={TextInputValueHolder => this.setState({TextInputValueHolder})} style={{textAlign: 'center', marginBottom: 7, height: 50}} /> <Button title="Get Text Input Entered Value" onPress={this.GetValueFunction} color="#2196F3" /> </View> ); } } const styles = StyleSheet.create({ MainContainer :{ justifyContent: 'center', flex:1, margin: 10 } }); AppRegistry.registerComponent('Myproject', () => Myproject); |
اسکرین شات


لیست جلسات قبل آموزش React Native
- React Native یا ریکت نیتیو چیست؟
- آموزش React Native – نصب و تنظیم محیط React Native
- آموزش App در React Native
- آموزش کار با State در React Native
- آموزش کار با کامپوننت Props در React Native
- آموزش استایل دهی در برنامه نویسی React Native
- آموزش flex در برنامه نویسی react native
- آموزش لیست ویو در برنامه نویسی React Native
راستی! برای دریافت مطالب جدید در کانال تلگرام یا پیج اینستاگرام سورس باران عضو شوید.
- انتشار: 23 ژوئن 2020
دسته بندی موضوعات
- آموزش ارز دیجیتال
- آموزش برنامه نویسی
- آموزش متنی برنامه نویسی
- اطلاعیه و سایر مطالب
- پروژه برنامه نویسی
- دوره های تخصصی برنامه نویسی
- رپورتاژ
- فیلم های آموزشی
- ++C
- ADO.NET
- Adobe Flash
- Ajax
- AngularJS
- apache
- ARM
- Asp.Net
- ASP.NET MVC
- AVR
- Bootstrap
- CCNA
- CCNP
- CMD
- CSS
- Dreameaver
- EntityFramework
- HTML
- IOS
- jquery
- Linq
- Mysql
- Oracle
- PHP
- PHPMyAdmin
- Rational Rose
- silver light
- SQL Server
- Stimulsoft Reports
- Telerik
- UML
- VB.NET&VB6
- WPF
- Xml
- آموزش های پروژه محور
- اتوکد
- الگوریتم تقریبی
- امنیت
- اندروید
- اندروید استودیو
- بک ترک
- بیسیک فور اندروید
- پایتون
- جاوا
- جاوا اسکریپت
- جوملا
- دلفی
- دوره آموزش Go
- دوره های رایگان پیشنهادی
- زامارین
- سئو
- ساخت CMS
- سی شارپ
- شبکه و مجازی سازی
- طراحی الگوریتم
- طراحی بازی
- طراحی وب
- فتوشاپ
- فریم ورک codeigniter
- فلاتر
- کانستراکت
- کریستال ریپورت
- لاراول
- معماری کامپیوتر
- مهندسی اینترنت
- هوش مصنوعی
- یونیتی
- کتاب های آموزشی
- Android
- ASP.NET
- AVR
- LINQ
- php
- Workflow
- اچ تی ام ال
- بانک اطلاعاتی
- برنامه نویسی سوکت
- برنامه نویسی موبایل
- پاسکال
- پایان نامه
- پایتون
- جاوا
- جاوا اسکریپت
- جی کوئری
- داده کاوی
- دلفی
- رباتیک
- سئو
- سایر کتاب ها
- سخت افزار
- سی اس اس
- سی پلاس پلاس
- سی شارپ
- طراحی الگوریتم
- فتوشاپ
- مقاله
- مهندسی نرم افزار
- هک و امنیت
- هوش مصنوعی
- ویژوال بیسیک
- نرم افزار و ابزار برنامه نویسی
- وردپرس