
صفحه Login در برنامه نویسی اندروید

صفحه Login در برنامه نویسی اندروید
در این درس از مجموعه آموزش برنامه نویسی سایت سورس باران، در مورد صفحه Login در برنامه نویسی اندروید صحبت خواهیم کرد.
یک برنامه login یک صفحه ورودی است که از کاربران برای ورود به برنامه های خاص درخواست اعتبار نامه می کند. شاید هنگام ورود به فیس بوک ، توییتر، اینستاگرام و غیره آن را دیده باشید
در این درس، چگونگی ایجاد صفحه Login در برنامه نویسی اندروید به سیستم و نحوه مدیریت امنیت هنگام تلاش های نادرست توضیح داده می شود.
ابتدا باید دو TextView که نام کاربری و رمز ورود کاربر را می پرسد تعریف کنید. رمز ورود TextView باید inputType را روی گذرواژه تنظیم کند. نحو آن در زیر آورده شده است:
|
1 2 3 4 5 6 7 8 9 10 11 |
<EditText android:id = "@+id/editText2" android:layout_width = "wrap_content" android:layout_height = "wrap_content" android:inputType = "textPassword" /> <EditText android:id = "@+id/editText1" android:layout_width = "wrap_content" android:layout_height = "wrap_content" /> |
یک دکمه با متن Login به سیستم با استفاده از ویژگی onClick تعریف کنید. پس از آن تابع مربوط به ویژگی onClick در فایل جاوا را تعریف کنید:
|
1 2 3 4 5 6 7 |
<Button android:id = "@+id/button1" android:layout_width = "wrap_content" android:layout_height = "wrap_content" android:onClick = "login" android:text = "@string/Login" /> |
در فایل جاوا، با استفاده از روش onClick متن نام کاربری و رمزهای عبور را با استفاده از متد ()getText و ()toString دریافت کرده و با استفاده از تابع ()equals با متن مطابقت دهید.
|
1 2 3 4 5 6 7 8 9 10 |
EditText username = (EditText)findViewById(R.id.editText1); EditText password = (EditText)findViewById(R.id.editText2); public void login(View view){ if(username.getText().toString().equals("admin") && password.getText().toString().equals("admin")){ //correcct password }else{ //wrong password } |
آخرین کاری که باید انجام دهید تهیه مکانیزم امنیتی است، بنابراین باید از تلاش های ناخواسته جلوگیری شود. برای این کار یک متغیر، مقدار دهی اولیه می شود و در هر تلاش نادرست، آن را کاهش می دهیم. و هنگامی که به 0 رسید ، دکمه Login را غیرفعال کنید.
|
1 2 3 4 5 6 |
int counter = 3; counter--; if(counter==0){ //disble the button, close the application e.t.c } |
مثال
در اینجا مثالی از برنامه ورود به سیستم وجود دارد. این برنامه فقط امکان سه تلاش برای ورود به یک برنامه را به شما می دهد.
برای آزمایش این مثال، می توانید آن را روی دستگاه واقعی یا شبیه ساز اجرا کنید.
مراحل شرح
1 شما برای ایجاد یک برنامه اندروید تحت یک پکیج com.example.sairamkrishna.myapplication از Android studio استفاده خواهید کرد.
3 برای افزودن کد لازم ، پرونده src / MainActivity.java را تغییر دهید.
4 res / layout / activity_main را تغییر دهید تا مولفه های XML مربوطه اضافه شود
5 برنامه را اجرا کنید و دستگاه اندرویدی در حال اجرا را انتخاب کنید و برنامه را روی آن نصب کنید و نتایج را بررسی کنید
در زیر محتوای پرونده فعالیت اصلی تغییر یافته src / MainActivity.java است.
|
1 2 3 4 5 6 7 8 9 10 11 12 13 14 15 16 17 18 19 20 21 22 23 24 25 26 27 28 29 30 31 32 33 34 35 36 37 38 39 40 41 42 43 44 45 46 47 48 49 50 51 52 53 54 55 56 57 58 59 60 61 62 63 64 |
package com.example.sairamkrishna.myapplication; import android.app.Activity; import android.graphics.Color; import android.os.Bundle; import android.view.View; import android.widget.Button; import android.widget.EditText; import android.widget.TextView; import android.widget.Toast; public class MainActivity extends Activity { Button b1,b2; EditText ed1,ed2; TextView tx1; int counter = 3; @Override protected void onCreate(Bundle savedInstanceState) { super.onCreate(savedInstanceState); setContentView(R.layout.activity_main); b1 = (Button)findViewById(R.id.button); ed1 = (EditText)findViewById(R.id.editText); ed2 = (EditText)findViewById(R.id.editText2); b2 = (Button)findViewById(R.id.button2); tx1 = (TextView)findViewById(R.id.textView3); tx1.setVisibility(View.GONE); b1.setOnClickListener(new View.OnClickListener() { @Override public void onClick(View v) { if(ed1.getText().toString().equals("admin") && ed2.getText().toString().equals("admin")) { Toast.makeText(getApplicationContext(), "Redirecting...",Toast.LENGTH_SHORT).show(); }else{ Toast.makeText(getApplicationContext(), "Wrong Credentials",Toast.LENGTH_SHORT).show(); tx1.setVisibility(View.VISIBLE); tx1.setBackgroundColor(Color.RED); counter--; tx1.setText(Integer.toString(counter)); if (counter == 0) { b1.setEnabled(false); } } } }); b2.setOnClickListener(new View.OnClickListener() { @Override public void onClick(View v) { finish(); } }); } } |
در زیر محتوای اصلاح شده xml res / layout / activity_main.xml آمده است.
|
1 2 3 4 5 6 7 8 9 10 11 12 13 14 15 16 17 18 19 20 21 22 23 24 25 26 27 28 29 30 31 32 33 34 35 36 37 38 39 40 41 42 43 44 45 46 47 48 49 50 51 52 53 54 55 56 57 58 59 60 61 62 63 64 65 66 67 68 69 70 71 72 73 74 75 76 77 78 79 80 81 82 83 84 85 86 87 88 89 90 91 92 93 94 95 96 97 98 99 100 101 102 103 104 |
<?xml version = "1.0" encoding = "utf-8"?> <RelativeLayout xmlns:android = "http://schemas.android.com/apk/res/android" xmlns:tools = "http://schemas.android.com/tools" android:layout_width="match_parent" android:layout_height = "match_parent" android:paddingLeft= "@dimen/activity_horizontal_margin" android:paddingRight = "@dimen/activity_horizontal_margin" android:paddingTop = "@dimen/activity_vertical_margin" android:paddingBottom = "@dimen/activity_vertical_margin" tools:context = ".MainActivity"> <TextView android:text = "Login" android:layout_width="wrap_content" android:layout_height = "wrap_content" android:id = "@+id/textview" android:textSize = "35dp" android:layout_alignParentTop = "true" android:layout_centerHorizontal = "true" /> <TextView android:layout_width = "wrap_content" android:layout_height = "wrap_content" android:text = "Tutorials point" android:id = "@+id/textView" android:layout_below = "@+id/textview" android:layout_centerHorizontal = "true" android:textColor = "#ff7aff24" android:textSize = "35dp" /> <EditText android:layout_width = "wrap_content" android:layout_height = "wrap_content" android:id = "@+id/editText" android:hint = "Enter Name" android:focusable = "true" android:textColorHighlight = "#ff7eff15" android:textColorHint = "#ffff25e6" android:layout_marginTop = "46dp" android:layout_below = "@+id/imageView" android:layout_alignParentLeft = "true" android:layout_alignParentStart = "true" android:layout_alignParentRight = "true" android:layout_alignParentEnd = "true" /> <ImageView android:layout_width="wrap_content" android:layout_height="wrap_content" android:id="@+id/imageView" android:src="@drawable/abc" android:layout_below="@+id/textView" android:layout_centerHorizontal="true" /> <EditText android:layout_width="wrap_content" android:layout_height="wrap_content" android:inputType="textPassword" android:ems="10" android:id="@+id/editText2" android:layout_below="@+id/editText" android:layout_alignParentLeft="true" android:layout_alignParentStart="true" android:layout_alignRight="@+id/editText" android:layout_alignEnd="@+id/editText" android:textColorHint="#ffff299f" android:hint="Password" /> <TextView android:layout_width="wrap_content" android:layout_height="wrap_content" android:text="Attempts Left:" android:id="@+id/textView2" android:layout_below="@+id/editText2" android:layout_alignParentLeft="true" android:layout_alignParentStart="true" android:textSize="25dp" /> <TextView android:layout_width="wrap_content" android:layout_height="wrap_content" android:text="New Text" android:id="@+id/textView3" android:layout_alignTop="@+id/textView2" android:layout_alignParentRight="true" android:layout_alignParentEnd="true" android:layout_alignBottom="@+id/textView2" android:layout_toEndOf="@+id/textview" android:textSize="25dp" android:layout_toRightOf="@+id/textview" /> <Button android:layout_width="wrap_content" android:layout_height="wrap_content" android:text="login" android:id="@+id/button" android:layout_alignParentBottom="true" android:layout_toLeftOf="@+id/textview" android:layout_toStartOf="@+id/textview" /> <Button android:layout_width="wrap_content" android:layout_height="wrap_content" android:text="Cancel" android:id="@+id/button2" android:layout_alignParentBottom="true" android:layout_toRightOf="@+id/textview" android:layout_toEndOf="@+id/textview" /> </RelativeLayout> |
در زیر محتوای res / values / string.xml آمده است.
|
1 2 3 |
<resources> <string name="app_name">My Application</string> </resources> |
در زیر محتوای فایل AndroidManifest.xml آمده است.
|
1 2 3 4 5 6 7 8 9 10 11 12 13 14 15 16 17 18 19 20 21 22 23 |
<?xml version="1.0" encoding="utf-8"?> <manifest xmlns:android="http://schemas.android.com/apk/res/android" package="com.example.sairamkrishna.myapplication" > <application android:allowBackup="true" android:icon="@mipmap/ic_launcher" android:label="@string/app_name" android:theme="@style/AppTheme" > <activity android:name=".MainActivity" android:label="@string/app_name" > <intent-filter> <action android:name="android.intent.action.MAIN" /> <category android:name="android.intent.category.LAUNCHER" /> </intent-filter> </activity> </application> </manifest> |
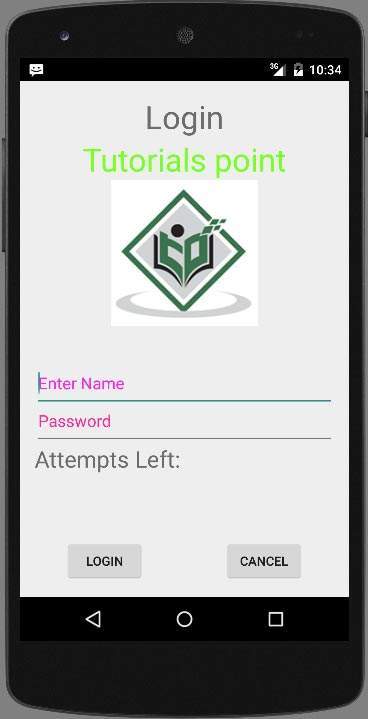
بیایید برنامه خود را اجرا کنیم! من تصور می کنم شما AVD خود را هنگام راه اندازی محیط ایجاد کرده اید. برای اجرای برنامه از Android studio، یکی از پرونده های فعالیت پروژه خود را باز کنید و از نوار ابزار روی  کلیک کنید. Android Studio برنامه را روی AVD شما نصب کرده و شروع به کار می کند و اگر با تنظیمات و برنامه هایتان همه چیز خوب باشد، زیر پنجره شبیه ساز نمایش داده می شود.
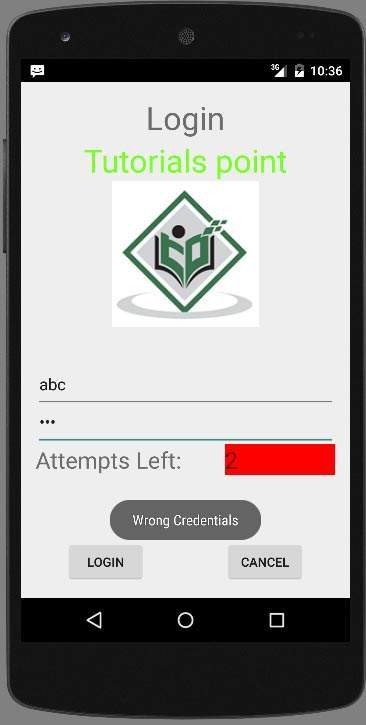
حالا متنی را در قسمت نام کاربری و رمز ورود تایپ کنید و سپس دکمه ورود را فشار دهید. من در قسمت نام کاربری abc و در قسمت رمز عبور abc قرار می دهم. من تلاش ناموفق داشتم این در زیر نشان داده شده است:
دو بار دیگر این کار را انجام دهید، خواهید دید که 0 تلاش برای ورود به سیستم باقی مانده و دکمه login شما غیرفعال است.
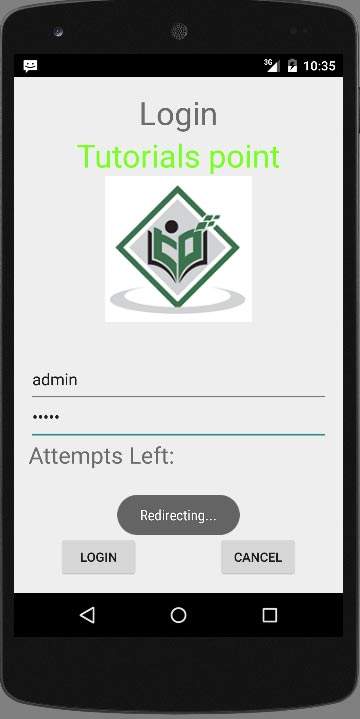
حالا دوباره برنامه را باز کنید و این بار نام کاربری صحیح را به عنوان admin و رمز عبور را به عنوان password وارد کنید و بر روی ورود کلیک کنید. با موفقیت وارد سیستم خواهید شد
اگر کاربر دکمه cancel را فشار دهد، برنامه صفحه Login به سیستم را می بندد.
لیست جلسات قبل آموزش برنامه نویسی اندروید
- نگاهی کلی به برنامه نویسی اندروید
- تنظیمات محیط در برنامه نویسی اندروید
- معماری برنامه نویسی اندروید
- اجزای برنامه در برنامه نویسی اندروید
- Hello World در برنامه نویسی اندروید
- سازماندهی و دسترسی به منابع در برنامه نویسی اندروید
- فعالیت در برنامه نویسی اندروید
- سرویس در برنامه نویسی اندروید
- گیرنده های پخش در برنامه نویسی اندروید
- ارائه دهنده محتوا در برنامه نویسی اندروید
- قطعات در برنامه نویسی اندروید
- Intent و فیلتر در برنامه نویسی اندروید
- طرح بندی رابط کاربری در برنامه نویسی اندروید
- کنترل های رابط کاربری در برنامه نویسی اندروید
- مدیریت رویدادها در برنامه نویسی اندروید
- استایل و تم ها در برنامه نویسی اندروید
- اجزای سفارشی در برنامه نویسی اندروید
- کشیدن و رها کردن در برنامه نویسی اندروید
- نوتیفیکیشن ها در برنامه نویسی اندروید
- سرویس های مبتنی بر مکان در برنامه نویسی اندروید
- ارسال ایمیل در برنامه نویسی اندروید
- ارسال پیامک در برنامه نویسی اندروید
- تماس های تلفنی در برنامه نویسی اندروید
- انتشار برنامه اندروید
- آموزش Alert Dialog در برنامه نویسی اندروید
- انیمیشن در برنامه نویسی اندروید
- ضبط صدا در برنامه نویسی اندروید
- مدیریت صدا در برنامه نویسی اندروید
- آموزش Auto Complete در برنامه نویسی اندروید
- بهترین شیوه ها در برنامه نویسی اندروید
- بلوتوث در برنامه نویسی اندروید
- استفاده از دوربین در برنامه نویسی اندروید
- کلیپ بورد در برنامه نویسی اندروید
- فونت سفارشی در برنامه نویسی اندروید
- پشتیبان گیری از داده ها در برنامه نویسی اندروید
- ابزارهای توسعه دهنده در برنامه نویسی اندروید
- آموزش شبیه ساز در برنامه نویسی اندروید
- اتصال به فیس بوک در برنامه نویسی اندروید
- حرکات لمسی در برنامه نویسی اندروید
- آموزش گوگل مپ در برنامه نویسی اندروید
- افکت های تصویر در برنامه نویسی اندروید
- Image Switcher در برنامه نویسی اندروید
- حافظه داخلی در برنامه نویسی اندروید
- آموزش کار با JetPlayer در برنامه نویسی اندروید
- JSON Parser در برنامه نویسی اندروید
- ارتباط با LinkedIn در برنامه نویسی اندروید
- نوار پیشرفت Spinner در برنامه نویسی اندروید
- بومی سازی در برنامه نویسی اندروید


.svg)
دیدگاه شما