
Push Notification در برنامه نویسی اندروید
Push Notification در برنامه نویسی اندروید
در این درس از مجموعه آموزش برنامه نویسی سایت سورس باران، در مورد Push Notification در برنامه نویسی اندروید صحبت خواهیم کرد.
Notification یا اعلان پیامی است که می توانید خارج از رابط کاربری عادی برنامه خود به کاربر نمایش دهید. به راحتی می توانید اعلان های خود را در اندروید ایجاد کنید.
اندروید کلاس NotificationManager را برای این منظور ارائه می دهد.
برای استفاده از این کلاس، باید با درخواست سیستم اندروید از طریق متد () getSystemService ، یک شی از این کلاس را پیاده سازی کنید. نحو آن در زیر آورده شده است :
NotificationManager NM;
NM=(NotificationManager)getSystemService(Context.NOTIFICATION_SERVICE);
پس از آن، شما Notification through Notification class را ایجاد می کنید و ویژگی های آن مانند آیکون، عنوان و زمان و غیره را مشخص می کنید. نحو آن در زیر آورده شده است:
Notification notify = new Notification(android.R.drawable.stat_notify_more,title,System.currentTimeMillis());
مورد بعدی که باید انجام دهید این است که ارسال محتوا و intent به عنوان یک پارامتر PendingIntent ایجاد کنید. با دادن PendingIntent به یک برنامه دیگر، به شما این حق را می دهید که عملیاتی را که مشخص کرده اید انجام دهد،
PendingIntent pending = PendingIntent.getActivity(getApplicationContext(), 0, new Intent(),0);
آخرین کاری که شما باید انجام دهید این است که فراخوانی متد setLatestEventInfo از کلاس Notification و pending intent با موضوع Notification و جزئیات بدنه را ارسال کنید. نحو آن در زیر آورده شده است.
و سپس سرانجام متد notify کلاس NotificationManager را فراخوانی کنید
notify.setLatestEventInfo(getApplicationContext(), subject, body,pending);
NM.notify(0, notify);
به غیر از متد notify، در کلاس NotificationManager متد های دیگری نیز وجود دارد. آنها در زیر ذکر شده اند:
- (cancel(int id
این متد یک Notification که قبلاً نشان داده شده را لغو می کند.
- (cancel(String tag, int id
این متد همچنین Notification را که قبلاً نشان داده شده لغو می کند.
- ()cancelAll
این متد همه Notification های نشان داده شده قبلی را لغو می کند.
- (notify(int id, Notification notification
این متد یک Notification ارسال می کند تا در نوار وضعیت نشان داده شود.
- (notify(String tag, int id, Notification notification
این متد همچنین یک Notification ارسال کنید تا در نوار وضعیت نشان داده شود.
مثال
مثال زیر استفاده از کلاس NotificationManager را نشان می دهد. این برنامه به شما امکان می دهد یک اعلان ایجاد کنید.
برای آزمایش این مثال، باید این مورد را روی دستگاه واقعی یا شبیه ساز اجرا کنید.
شرح مراحل
۱- از Android studio برای ایجاد یک برنامه اندروید تحت یک packcomcom.example.sairamkrishna.myapplication استفاده خواهید کرد.
۲- برای افزودن کد اعلان ، پرونده src / MainActivity.java را تغییر دهید.
۳- طرح XML را تغییر دهید فایل res / layout / activity_main.xml در صورت لزوم هر جز GUI اضافه کنید.
۴- برنامه را اجرا کنید و دستگاه اندرویدی در حال اجرا را انتخاب کنید و برنامه را روی آن نصب کنید و نتایج را یررسی کنید.
در اینجا محتوای MainActivity.java است.
package com.example.sairamkrishna.myapplication;

import android.app.Notification;
import android.app.NotificationManager;

import android.content.Context;
import android.support.v7.app.ActionBarActivity;
import android.os.Bundle;
import android.view.View;

import android.widget.Button;
import android.widget.EditText;

public class MainActivity extends ActionBarActivity {
   EditText ed1,ed2,ed3;
   protected void onCreate(Bundle savedInstanceState) {
      super.onCreate(savedInstanceState);
      setContentView(R.layout.activity_main);

      ed1=(EditText)findViewById(R.id.editText);
      ed2=(EditText)findViewById(R.id.editText2);
      ed3=(EditText)findViewById(R.id.editText3);
      Button b1=(Button)findViewById(R.id.button);

      b1.setOnClickListener(new View.OnClickListener() {
         @Override
         public void onClick(View v) {
            String tittle=ed1.getText().toString().trim();
            String subject=ed2.getText().toString().trim();
            String body=ed3.getText().toString().trim();

            NotificationManager notif=(NotificationManager)getSystemService(Context.NOTIFICATION_SERVICE);
            Notification notify=new Notification.Builder
               (getApplicationContext()).setContentTitle(tittle).setContentText(body).
               setContentTitle(subject).setSmallIcon(R.drawable.abc).build();

               notify.flags |= Notification.FLAG_AUTO_CANCEL;
               notif.notify(0, notify);
         }
      });
   }
}
در اینجا محتوای activity_main.xml است
<?xml version="1.0" encoding="utf-8"?>
<RelativeLayout xmlns:android="http://schemas.android.com/apk/res/android"
   xmlns:tools="http://schemas.android.com/tools" android:layout_width="match_parent"
   android:layout_height="match_parent" android:paddingLeft="@dimen/activity_horizontal_margin"
   android:paddingRight="@dimen/activity_horizontal_margin"
   android:paddingTop="@dimen/activity_vertical_margin"
   android:paddingBottom="@dimen/activity_vertical_margin" tools:context=".MainActivity">

   <TextView
      android:layout_width="wrap_content"
      android:layout_height="wrap_content"
      android:text="Notification"
      android:id="@+id/textView"
      android:layout_alignParentTop="true"
      android:layout_centerHorizontal="true"
      android:textSize="30dp" />
      .
   <TextView
      android:layout_width="wrap_content"
      android:layout_height="wrap_content"
      android:text="Tutorials Point"
      android:id="@+id/textView2"
      android:layout_below="@+id/textView"
      android:layout_centerHorizontal="true"
      android:textSize="35dp"
      android:textColor="#ff16ff01" />

   <EditText
      android:layout_width="wrap_content"
      android:layout_height="wrap_content"
      android:id="@+id/editText"
      android:layout_below="@+id/textView2"
      android:layout_alignLeft="@+id/textView2"
      android:layout_alignStart="@+id/textView2"
      android:layout_marginTop="52dp"
      android:layout_alignRight="@+id/textView2"
      android:layout_alignEnd="@+id/textView2"
      android:hint="Name" />

   <EditText
      android:layout_width="wrap_content"
      android:layout_height="wrap_content"
      android:id="@+id/editText2"
      android:hint="Subject"
      android:layout_below="@+id/editText"
      android:layout_alignLeft="@+id/editText"
      android:layout_alignStart="@+id/editText"
      android:layout_alignRight="@+id/editText"
      android:layout_alignEnd="@+id/editText" />

   <EditText
      android:layout_width="wrap_content"
      android:layout_height="wrap_content"
      android:inputType="textPersonName"
      android:ems="10"
      android:id="@+id/editText3"
      android:hint="Body"
      android:layout_below="@+id/editText2"
      android:layout_alignLeft="@+id/editText2"
      android:layout_alignStart="@+id/editText2"
      android:layout_alignRight="@+id/editText2"
      android:layout_alignEnd="@+id/editText2" />

   <Button
      android:layout_width="wrap_content"
      android:layout_height="wrap_content"
      android:text="Notification"
      android:id="@+id/button"
      android:layout_marginTop="77dp"
      android:layout_below="@+id/editText3"
      android:layout_alignRight="@+id/textView"
      android:layout_alignEnd="@+id/textView" />

</RelativeLayout>
در اینجا محتوای AndroidManifest.xml است.
<?xml version="1.0" encoding="utf-8"?>
<manifest xmlns:android="http://schemas.android.com/apk/res/android"
   package="com.example.sairamkrishna.myapplication" >

   <application
      android:allowBackup="true"
      android:icon="@mipmap/ic_launcher"
      android:label="@string/app_name"
      android:theme="@style/AppTheme" >

      <activity
         android:name=".MainActivity"
         android:label="@string/app_name" >

         <intent-filter>
            <action android:name="android.intent.action.MAIN" />
            <category android:name="android.intent.category.LAUNCHER" />
         </intent-filter>

      </activity>

   </application>
</manifest>
بیایید برنامه خود را اجرا کنیم! من تصور می کنم شما AVD خود را هنگام راه اندازی محیط ایجاد کرده اید. برای اجرای برنامه از Android studio، یکی از پرونده های فعالیت پروژه خود را باز کنید و از نوار ابزار روی  کلیک کنید. Android Studio برنامه را روی AVD شما نصب کرده و شروع به کار می کند و اگر با تنظیمات و برنامه هایتان همه چیز خوب باشد، زیر پنجره شبیه ساز نمایش داده می شود.
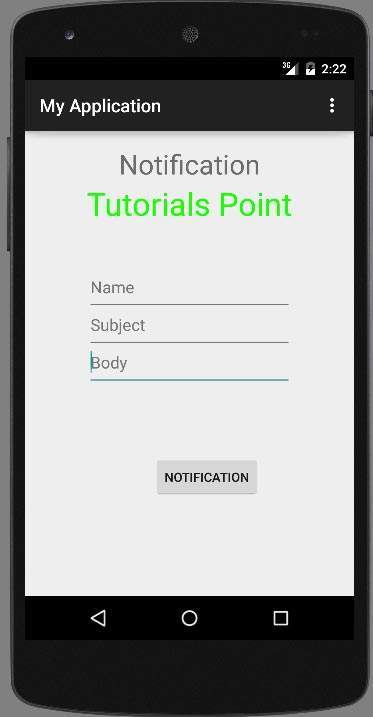
اکنون قسمت مربوط به عنوان، موضوع و بدنه ی را پر کنید. این در زیر نشان داده شده است:
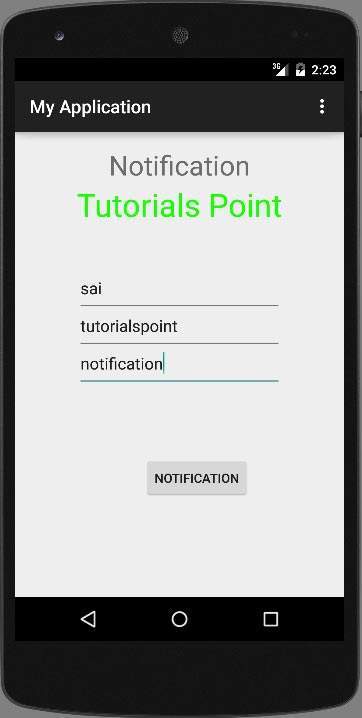
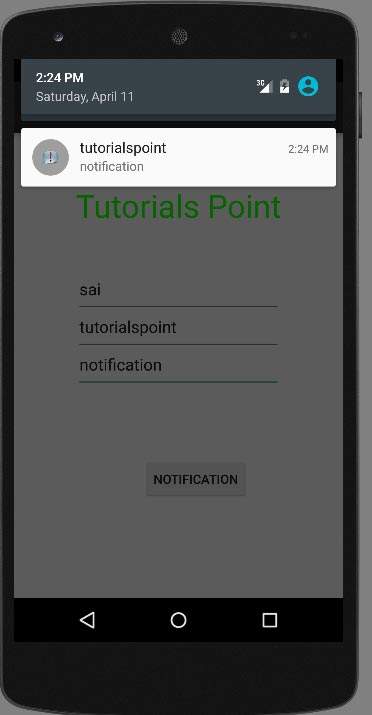
اکنون بر روی دکمه notify کلیک کنید و اعلانی را در نوار اعلان بالا مشاهده خواهید کرد. در زیر نشان داده شده است
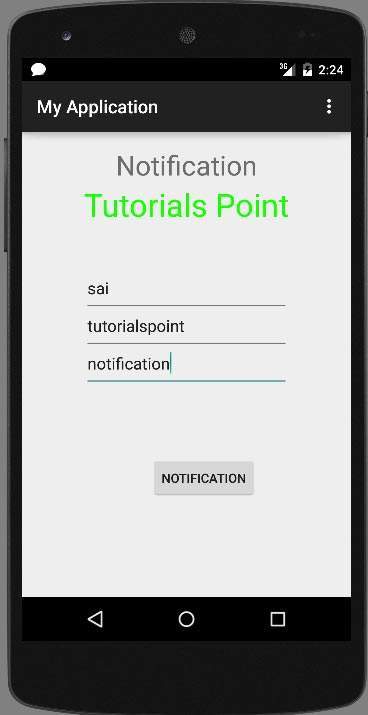
اکنون نوار اعلان را به پایین بکشید و اعلان را مشاهده کنید. این در زیر نشان داده شده است
لیست جلسات قبل آموزش برنامه نویسی اندروید
- نگاهی کلی به برنامه نویسی اندروید
- تنظیمات محیط در برنامه نویسی اندروید
- معماری برنامه نویسی اندروید
- اجزای برنامه در برنامه نویسی اندروید
- Hello World در برنامه نویسی اندروید
- سازماندهی و دسترسی به منابع در برنامه نویسی اندروید
- فعالیت در برنامه نویسی اندروید
- سرویس در برنامه نویسی اندروید
- گیرنده های پخش در برنامه نویسی اندروید
- ارائه دهنده محتوا در برنامه نویسی اندروید
- قطعات در برنامه نویسی اندروید
- Intent و فیلتر در برنامه نویسی اندروید
- طرح بندی رابط کاربری در برنامه نویسی اندروید
- کنترل های رابط کاربری در برنامه نویسی اندروید
- مدیریت رویدادها در برنامه نویسی اندروید
- استایل و تم ها در برنامه نویسی اندروید
- اجزای سفارشی در برنامه نویسی اندروید
- کشیدن و رها کردن در برنامه نویسی اندروید
- نوتیفیکیشن ها در برنامه نویسی اندروید
- سرویس های مبتنی بر مکان در برنامه نویسی اندروید
- ارسال ایمیل در برنامه نویسی اندروید
- ارسال پیامک در برنامه نویسی اندروید
- تماس های تلفنی در برنامه نویسی اندروید
- انتشار برنامه اندروید
- آموزش Alert Dialog در برنامه نویسی اندروید
- انیمیشن در برنامه نویسی اندروید
- ضبط صدا در برنامه نویسی اندروید
- مدیریت صدا در برنامه نویسی اندروید
- آموزش Auto Complete در برنامه نویسی اندروید
- بهترین شیوه ها در برنامه نویسی اندروید
- بلوتوث در برنامه نویسی اندروید
- استفاده از دوربین در برنامه نویسی اندروید
- کلیپ بورد در برنامه نویسی اندروید
- فونت سفارشی در برنامه نویسی اندروید
- پشتیبان گیری از داده ها در برنامه نویسی اندروید
- ابزارهای توسعه دهنده در برنامه نویسی اندروید
- آموزش شبیه ساز در برنامه نویسی اندروید
- اتصال به فیس بوک در برنامه نویسی اندروید
- حرکات لمسی در برنامه نویسی اندروید
- آموزش گوگل مپ در برنامه نویسی اندروید
- افکت های تصویر در برنامه نویسی اندروید
- Image Switcher در برنامه نویسی اندروید
- حافظه داخلی در برنامه نویسی اندروید
- آموزش کار با JetPlayer در برنامه نویسی اندروید
- JSON Parser در برنامه نویسی اندروید
- ارتباط با LinkedIn در برنامه نویسی اندروید
- نوار پیشرفت Spinner در برنامه نویسی اندروید
- بومی سازی در برنامه نویسی اندروید
- صفحه Login در برنامه نویسی اندروید
- MediaPlayer در برنامه نویسی اندروید
- Multitouch در برنامه نویسی اندروید
- Navigation در برنامه نویسی اندروید
- اتصال به اینترنت در برنامه نویسی اندروید
- NFC در برنامه نویسی اندروید
- PHP و MYSQL در برنامه نویسی اندروید
- Progress Circle دربرنامه نویسی اندروید
- Progress Bar در برنامه نویسی اندروید


.svg)
دیدگاه شما