
RSS Reader در برنامه نویسی اندروید

RSS Reader در برنامه نویسی اندروید
در این درس از مجموعه آموزش برنامه نویسی سایت سورس باران، در مورد RSS Reader در برنامه نویسی اندروید صحبت خواهیم کرد.
RSS مخفف Really Simple Syndication است. RSS روشی آسان برای به اشتراک گذاشتن به روزرسانی ها و مطالب وب سایت شما با کاربران است تا کاربران مجبور نباشند روزانه از سایت شما برای هر نوع به روزرسانی بازدید کنند.
مثالی از RSS Reader در برنامه نویسی اندروید
RSS سندی است که توسط وب سایت با پسوند .xml ایجاد می شود.
به راحتی می توانید این سند را تجزیه کرده و در برنامه خود به کاربر نشان دهید.
یک سند RSS به این شکل است.
|
1 2 3 4 5 6 7 |
<rss version="2.0"> <channel> <title>Sample RSS</title> <link>http://www.google.com</link> <description>World's best search engine</description> </channel> </rss> |
عناصر RSS در برنامه نویسی اندروید
یک سند RSS دارای عناصر زیر است.
- channel
این عنصر برای توصیف خوراک RSS استفاده می شود
- title
عنوان کانال را تعریف می کند
- link
هایپر لینک کانال را مشخص می کند
- description
کانال را توصیف می کند
تجزیه RSS
تجزیه یک سند RSS بیشتر شبیه تجزیه XML است.
بنابراین اکنون می خواهیم نحوه تجزیه یک سند XML را ببینیم.
برای این کار ما شی object XMLPullParser را ایجاد خواهیم کرد، اما برای ایجاد آن ابتدا شی object XmlPullParserFactory را ایجاد می کنیم و سپس برای ایجاد XMLPullParser متد ()newPullParser آن را فراخوانی می کنیم.
نحو آن در زیر آورده شده است:
|
1 2 |
private XmlPullParserFactory xmlFactoryObject = XmlPullParserFactory.newInstance(); private XmlPullParser myparser = xmlFactoryObject.newPullParser(); |
مرحله بعدی شامل مشخص کردن فایلی برای XmlPullParser است که حاوی XML است. این می تواند یک فایل باشد یا می تواند یک جریان باشد.
در مورد ما این یک جریان است. نحو آن در زیر آورده شده است:
|
1 |
myparser.setInput(stream, null); |
آخرین مرحله تجزیه XML است. یک فایل XML از رویدادها ، نام ، متن ، AttributesValue و غیره تشکیل شده است.
بنابراین XMLPullParser یک تابع جداگانه برای تجزیه هر یک از اجزای فایل XML دارد. نحو آن در زیر آورده شده است:
|
1 2 3 4 5 6 7 8 9 10 11 12 13 14 15 16 |
int event = myParser.getEventType(); while (event != XmlPullParser.END_DOCUMENT) { String name=myParser.getName(); switch (event){ case XmlPullParser.START_TAG: break; case XmlPullParser.END_TAG: if(name.equals("temperature")){ temperature = myParser.getAttributeValue(null,"value"); } break; } event = myParser.next(); } |
متد getEventType نوع رویدادی را که اتفاق می افتد را برمی گرداند.
به عنوان مثال: شروع سند، شروع برچسب و غیره
متد getName نام تگ را برمی گرداند و از آنجایی که ما فقط به temperature علاقه داریم، بنابراین ما فقط در عبارت شرطی بررسی می کنیم که اگر تگ temperature گرفتیم، متد getAttributeValue را فراخوانی می کنیم تا مقدار تگ temperature را به ما برگرداند.
جدا از این متدها، متدهای دیگری نیز برای تجزیه بهتر فایلهای XML توسط این کلاس ارائه شده است. این متد ها در زیر ذکر شده است:
- ()getAttributeCount
این متد فقط تعداد ویژگی های برچسب شروع فعلی را برمی گرداند.
- (getAttributeName(int index
این متد نام ویژگی مشخص شده با مقدار ایندکس را برمی گرداند.
- ()getColumnNumber
این متد مقدار ستون فعلی را برمی گرداند ، از 0 شروع می شود.
- ()getDepth
این متد عمق فعلی عنصر را برمی گرداند.
- ()getLineNumber
شماره خط فعلی را با شروع از 1 برمی گرداند.
- ()getNamespace
این متد نام فضای URI عنصر فعلی را برمی گرداند.
- ()getPrefix
این متد پیشوند عنصر فعلی را برمی گرداند.
- ()getName
این متد نام تگ را برمی گرداند.
- ()getText
این متد متن را برای یک عنصر خاص برمی گرداند.
()isWhitespace
این متد بررسی می کند که آیا رویداد TEXT فعلی فقط شامل کاراکتر های فضای سفید است.
مثال
در اینجا مثالی برای استفاده از کلاس XMLPullParser آورده شده است. این برنامه به شما امکان می دهد یک سند RSS موجود در اینجا در /android/sampleXML.xml را تجزیه کنید و سپس نتیجه را نشان دهید.
برای آزمایش این مثال، می توانید آن را روی دستگاه واقعی یا شبیه ساز اجرا کنید.
شرح مراحل
1- شما برای ایجاد یک برنامه اندروید تحت یک پکیج com.example.sairamkrishna.myapplication از Android studio استفاده خواهید کرد.
2- برای اضافه کردن کد لازم ، فایل src / MainActivity.java را تغییر دهید.
3- res / layout / activity_main را تغییر دهید تا مولفه های XML مربوطه اضافه شود.
4- برای واکشی و تجزیه داده های XML ، یک فایل جاوا جدید در src / HandleXML.java ایجاد کنید.
5- برای نمایش نتیجه XML ، یک فایل جاوا جدید در src / second.java ایجاد کنید
5- AndroidManifest.xml را تغییر دهید تا اجازه اینترنت لازم را اضافه کنید.
6- برنامه را اجرا کنید و دستگاه اندرویدی در حال اجرا را انتخاب کنید و برنامه را روی آن نصب کنید و نتایج را بررسی کنید.
در زیر محتوای پرونده فعالیت اصلی تغییر یافته src / MainActivity.java است.
|
1 2 3 4 5 6 7 8 9 10 11 12 13 14 15 16 17 18 19 20 21 22 23 24 25 26 27 28 29 30 31 32 33 34 35 36 37 38 39 40 41 42 43 44 45 46 47 48 49 50 51 |
package com.example.sairamkrishna.myapplication; import android.app.Activity; import android.content.Intent; import android.os.Bundle; import android.view.View; import android.widget.Button; import android.widget.EditText; public class MainActivity extends Activity { EditText title,link,description; Button b1,b2; private String finalUrl="http://tutorialspoint.com/android/sampleXML.xml"; private HandleXML obj; @Override protected void onCreate(Bundle savedInstanceState) { super.onCreate(savedInstanceState); setContentView(R.layout.activity_main); title = (EditText) findViewById(R.id.editText); link = (EditText) findViewById(R.id.editText2); description = (EditText) findViewById(R.id.editText3); b1=(Button)findViewById(R.id.button); b2=(Button)findViewById(R.id.button2); b1.setOnClickListener(new View.OnClickListener() { @Override public void onClick(View v) { obj = new HandleXML(finalUrl); obj.fetchXML(); while(obj.parsingComplete); title.setText(obj.getTitle()); link.setText(obj.getLink()); description.setText(obj.getDescription()); } }); b2.setOnClickListener(new View.OnClickListener() { @Override public void onClick(View v) { Intent in=new Intent(MainActivity.this,second.class); startActivity(in); } }); } } |
در زیر محتوای فایل java src / HandleXML.java است.
|
1 2 3 4 5 6 7 8 9 10 11 12 13 14 15 16 17 18 19 20 21 22 23 24 25 26 27 28 29 30 31 32 33 34 35 36 37 38 39 40 41 42 43 44 45 46 47 48 49 50 51 52 53 54 55 56 57 58 59 60 61 62 63 64 65 66 67 68 69 70 71 72 73 74 75 76 77 78 79 80 81 82 83 84 85 86 87 88 89 90 91 92 93 94 95 96 97 98 99 100 101 102 103 104 105 106 107 108 109 110 111 112 113 114 115 116 117 118 119 |
package com.example.rssreader; import java.io.InputStream; import java.net.HttpURLConnection; import java.net.URL; import org.xmlpull.v1.XmlPullParser; import org.xmlpull.v1.XmlPullParserFactory; import android.util.Log; public class HandleXML { private String title = "title"; private String link = "link"; private String description = "description"; private String urlString = null; private XmlPullParserFactory xmlFactoryObject; public volatile boolean parsingComplete = true; public HandleXML(String url){ this.urlString = url; } public String getTitle(){ return title; } public String getLink(){ return link; } public String getDescription(){ return description; } public void parseXMLAndStoreIt(XmlPullParser myParser) { int event; String text=null; try { event = myParser.getEventType(); while (event != XmlPullParser.END_DOCUMENT) { String name=myParser.getName(); switch (event){ case XmlPullParser.START_TAG: break; case XmlPullParser.TEXT: text = myParser.getText(); break; case XmlPullParser.END_TAG: if(name.equals("title")){ title = text; } else if(name.equals("link")){ link = text; } else if(name.equals("description")){ description = text; } else{ } break; } event = myParser.next(); } parsingComplete = false; } catch (Exception e) { e.printStackTrace(); } } public void fetchXML(){ Thread thread = new Thread(new Runnable(){ @Override public void run() { try { URL url = new URL(urlString); HttpURLConnection conn = (HttpURLConnection) url.openConnection(); conn.setReadTimeout(10000 /* milliseconds */); conn.setConnectTimeout(15000 /* milliseconds */); conn.setRequestMethod("GET"); conn.setDoInput(true); // Starts the query conn.connect(); InputStream stream = conn.getInputStream(); xmlFactoryObject = XmlPullParserFactory.newInstance(); XmlPullParser myparser = xmlFactoryObject.newPullParser(); myparser.setFeature(XmlPullParser.FEATURE_PROCESS_NAMESPACES, false); myparser.setInput(stream, null); parseXMLAndStoreIt(myparser); stream.close(); } catch (Exception e) { } } }); thread.start(); } } |
یک فایل ایجاد کنید و به عنوان پرونده second.java در فهرست java / second.java نامگذاری کنید
|
1 2 3 4 5 6 7 8 9 10 11 12 13 14 15 |
package com.example.sairamkrishna.myapplication; import android.app.Activity; import android.os.Bundle; import android.webkit.WebView; public class second extends Activity { @Override protected void onCreate(Bundle savedInstanceState) { super.onCreate(savedInstanceState); setContentView(R.layout.second_activity); WebView w1=(WebView)findViewById(R.id.webView); w1.loadUrl("http://tutorialspoint.com/android/sampleXML.xml"); } } |
یک فایل xml در res / layout / second_activity.xml ایجاد کنید
|
1 2 3 4 5 6 7 8 9 10 11 |
<?xml version="1.0" encoding="utf-8"?> <LinearLayout xmlns:android="http://schemas.android.com/apk/res/android" android:orientation="vertical" android:layout_width="match_parent" android:layout_height="match_parent"> <WebView android:layout_width="match_parent" android:layout_height="match_parent" android:id="@+id/webView" android:layout_gravity="center_horizontal" /> </LinearLayout> |
محتوای res / layout / activity_main.xml را به موارد زیر تغییر دهید –
|
1 2 3 4 5 6 7 8 9 10 11 12 13 14 15 16 17 18 19 20 21 22 23 24 25 26 27 28 29 30 31 32 33 34 35 36 37 38 39 40 41 42 43 44 45 46 47 48 49 50 51 52 53 54 55 56 57 58 59 60 61 62 63 64 65 66 67 68 69 70 71 72 73 74 75 76 77 78 79 80 81 82 83 84 85 86 87 88 89 90 91 92 93 |
<?xml version="1.0" encoding="utf-8"?> <RelativeLayout xmlns:android="http://schemas.android.com/apk/res/android" xmlns:tools="http://schemas.android.com/tools" android:layout_width="match_parent" android:layout_height="match_parent" android:paddingLeft="@dimen/activity_horizontal_margin" android:paddingRight="@dimen/activity_horizontal_margin" android:paddingTop="@dimen/activity_vertical_margin" android:paddingBottom="@dimen/activity_vertical_margin" tools:context=".MainActivity" android:transitionGroup="true"> <TextView android:text="RSS example" android:layout_width="wrap_content" android:layout_height="wrap_content" android:id="@+id/textview" android:textSize="35dp" android:layout_alignParentTop="true" android:layout_centerHorizontal="true" /> <TextView android:layout_width="wrap_content" android:layout_height="wrap_content" android:text="Tutorials point" android:id="@+id/textView" android:layout_below="@+id/textview" android:layout_centerHorizontal="true" android:textColor="#ff7aff24" android:textSize="35dp" /> <ImageView android:layout_width="wrap_content" android:layout_height="wrap_content" android:id="@+id/imageView" android:src="@drawable/abc" android:layout_below="@+id/textView" android:layout_centerHorizontal="true" android:theme="@style/Base.TextAppearance.AppCompat" /> <EditText android:layout_width="wrap_content" android:layout_height="wrap_content" android:id="@+id/editText" android:layout_below="@+id/imageView" android:hint="Tittle" android:textColorHint="#ff69ff0e" android:layout_alignParentRight="true" android:layout_alignParentEnd="true" android:layout_alignParentLeft="true" android:layout_alignParentStart="true" /> <EditText android:layout_width="wrap_content" android:layout_height="wrap_content" android:id="@+id/editText2" android:layout_below="@+id/editText" android:layout_alignLeft="@+id/editText" android:layout_alignStart="@+id/editText" android:textColorHint="#ff21ff11" android:hint="Link" android:layout_alignRight="@+id/editText" android:layout_alignEnd="@+id/editText" /> <EditText android:layout_width="wrap_content" android:layout_height="wrap_content" android:id="@+id/editText3" android:layout_below="@+id/editText2" android:layout_alignLeft="@+id/editText2" android:layout_alignStart="@+id/editText2" android:hint="Description" android:textColorHint="#ff33ff20" android:layout_alignRight="@+id/editText2" android:layout_alignEnd="@+id/editText2" /> <Button android:layout_width="wrap_content" android:layout_height="wrap_content" android:text="Fetch" android:id="@+id/button" android:layout_below="@+id/editText3" android:layout_alignParentLeft="true" android:layout_alignParentStart="true" android:layout_toLeftOf="@+id/imageView" android:layout_toStartOf="@+id/imageView" /> <Button android:layout_width="wrap_content" android:layout_height="wrap_content" android:text="Result" android:id="@+id/button2" android:layout_alignTop="@+id/button" android:layout_alignRight="@+id/editText3" android:layout_alignEnd="@+id/editText3" /> </RelativeLayout> |
res / values / string.xml را به حالت زیر تغییر دهید
|
1 2 3 |
<resources> <string name="app_name">My Application</string> </resources> |
این AndroidManifest.xml پیش فرض است.
|
1 2 3 4 5 6 7 8 9 10 11 12 13 14 15 16 17 18 19 20 21 22 23 24 25 |
<?xml version="1.0" encoding="utf-8"?> <manifest xmlns:android="http://schemas.android.com/apk/res/android" package="com.example.sairamkrishna.myapplication" > <uses-permission android:name="android.permission.INTERNET"/> <application android:allowBackup="true" android:icon="@mipmap/ic_launcher" android:label="@string/app_name" android:theme="@style/AppTheme" > <activity android:name=".MainActivity" android:label="@string/app_name" > <intent-filter> <action android:name="android.intent.action.MAIN" /> <category android:name="android.intent.category.LAUNCHER" /> </intent-filter> </activity> <activity android:name=".second"></activity> </application> </manifest> |
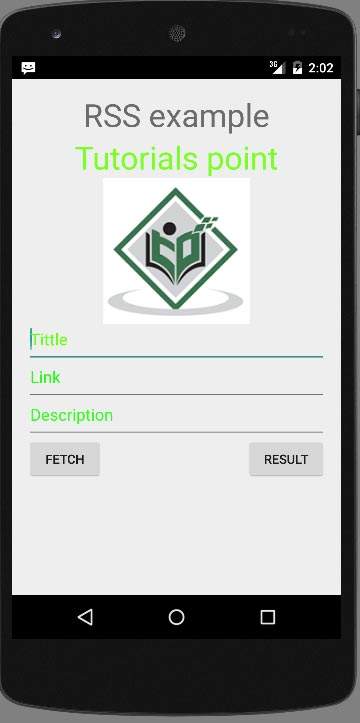
بیایید برنامه خود را اجرا کنیم! من تصور می کنم شما AVD خود را هنگام راه اندازی محیط ایجاد کرده اید. برای اجرای برنامه از Android studio، یکی از پرونده های فعالیت پروژه خود را باز کنید و از نوار ابزار روی  کلیک کنید. Android Studio برنامه را روی AVD شما نصب کرده و شروع به کار می کند و اگر با تنظیمات و برنامه هایتان همه چیز خوب باشد، زیر پنجره شبیه ساز نمایش داده می شود.
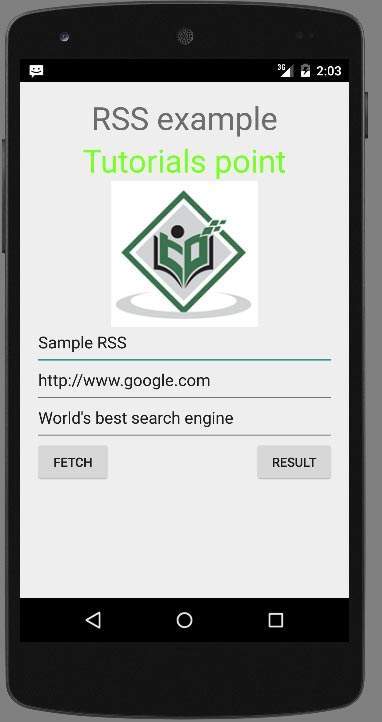
برای واکشی RSS کافیست دکمه Fetch Feed را فشار دهید. پس از فشار دادن، صفحه زیر ظاهر می شود که داده های RSS را نشان می دهد
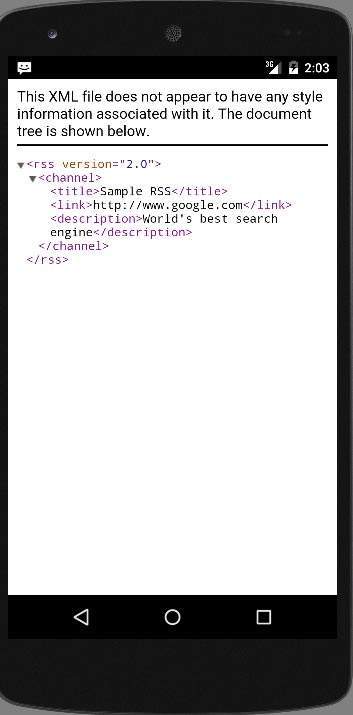
برای دیدن XML، که در http://tutorialspoint.com/android/sampleXML.xml قرار داده شده است، فقط دکمه result را فشار دهید
لیست جلسات قبل آموزش برنامه نویسی اندروید
- نگاهی کلی به برنامه نویسی اندروید
- تنظیمات محیط در برنامه نویسی اندروید
- معماری برنامه نویسی اندروید
- اجزای برنامه در برنامه نویسی اندروید
- Hello World در برنامه نویسی اندروید
- سازماندهی و دسترسی به منابع در برنامه نویسی اندروید
- فعالیت در برنامه نویسی اندروید
- سرویس در برنامه نویسی اندروید
- گیرنده های پخش در برنامه نویسی اندروید
- ارائه دهنده محتوا در برنامه نویسی اندروید
- قطعات در برنامه نویسی اندروید
- Intent و فیلتر در برنامه نویسی اندروید
- طرح بندی رابط کاربری در برنامه نویسی اندروید
- کنترل های رابط کاربری در برنامه نویسی اندروید
- مدیریت رویدادها در برنامه نویسی اندروید
- استایل و تم ها در برنامه نویسی اندروید
- اجزای سفارشی در برنامه نویسی اندروید
- کشیدن و رها کردن در برنامه نویسی اندروید
- نوتیفیکیشن ها در برنامه نویسی اندروید
- سرویس های مبتنی بر مکان در برنامه نویسی اندروید
- ارسال ایمیل در برنامه نویسی اندروید
- ارسال پیامک در برنامه نویسی اندروید
- تماس های تلفنی در برنامه نویسی اندروید
- انتشار برنامه اندروید
- آموزش Alert Dialog در برنامه نویسی اندروید
- انیمیشن در برنامه نویسی اندروید
- ضبط صدا در برنامه نویسی اندروید
- مدیریت صدا در برنامه نویسی اندروید
- آموزش Auto Complete در برنامه نویسی اندروید
- بهترین شیوه ها در برنامه نویسی اندروید
- بلوتوث در برنامه نویسی اندروید
- استفاده از دوربین در برنامه نویسی اندروید
- کلیپ بورد در برنامه نویسی اندروید
- فونت سفارشی در برنامه نویسی اندروید
- پشتیبان گیری از داده ها در برنامه نویسی اندروید
- ابزارهای توسعه دهنده در برنامه نویسی اندروید
- آموزش شبیه ساز در برنامه نویسی اندروید
- اتصال به فیس بوک در برنامه نویسی اندروید
- حرکات لمسی در برنامه نویسی اندروید
- آموزش گوگل مپ در برنامه نویسی اندروید
- افکت های تصویر در برنامه نویسی اندروید
- Image Switcher در برنامه نویسی اندروید
- حافظه داخلی در برنامه نویسی اندروید
- آموزش کار با JetPlayer در برنامه نویسی اندروید
- JSON Parser در برنامه نویسی اندروید
- ارتباط با LinkedIn در برنامه نویسی اندروید
- نوار پیشرفت Spinner در برنامه نویسی اندروید
- بومی سازی در برنامه نویسی اندروید
- صفحه Login در برنامه نویسی اندروید
- MediaPlayer در برنامه نویسی اندروید
- Multitouch در برنامه نویسی اندروید
- Navigation در برنامه نویسی اندروید
- اتصال به اینترنت در برنامه نویسی اندروید
- NFC در برنامه نویسی اندروید
- PHP و MYSQL در برنامه نویسی اندروید
- Progress Circle دربرنامه نویسی اندروید
- Progress Bar در برنامه نویسی اندروید
- Push Notification در برنامه نویسی اندروید
- RenderScript در برنامه نویسی اندروید


.svg)
دیدگاه شما