
پایگاه داده SQLite در برنامه نویسی اندروید

پایگاه داده SQLite در برنامه نویسی اندروید
در این درس از مجموعه آموزش برنامه نویسی سایت سورس باران، در مورد پایگاه داده SQLite در برنامه نویسی اندروید صحبت خواهیم کرد.
SQLite یک پایگاه داده SQL با منبع باز است که داده ها را در یک فایل متنی در دستگاه ذخیره می کند.
اندروید با پیاده سازی پایگاه داده SQLite ساخته شده است.
SQLite از تمام ویژگی های پایگاه داده رابطه ای پشتیبانی می کند. برای دسترسی به این پایگاه داده، نیازی به ایجاد هیچ نوع ارتباطی مانند JDBC ، ODBC برای آن ندارید.
پکیج پایگاه داده
پکیج اصلی android.database.sqlite است که شامل کلاسهایی برای مدیریت پایگاه داده های خود می باشد
ایجاد پایگاه داده
برای ایجاد یک پایگاه داده فقط باید این متد را openOrCreateDatabase با نام و حالت پایگاه داده خود به عنوان یک پارامتر فراخوانی کنید.
این نمونه ای از پایگاه داده SQLite را برمی گرداند که باید در شی خود دریافت کنید. نحو آن در زیر آورده شده است:
|
1 |
SQLiteDatabase mydatabase = openOrCreateDatabase("your database name",MODE_PRIVATE,null); |
به غیر از این، توابع دیگری نیز در پکیج پایگاه داده موجود است که این کار را انجام می دهد. آنها در زیر لیست شده اند:
- (openDatabase(String path, SQLiteDatabase.CursorFactory factory, int flags, DatabaseErrorHandler errorHandler
این متد فقط با حالت flag مناسب پایگاه داده موجود را باز می کند. حالت flag های مشترک می تواند OPEN_READWRITE و OPEN_READONLY باشد
- (openDatabase(String path, SQLiteDatabase.CursorFactory factory, int flags
این متد مشابه متد فوق است زیرا پایگاه داده موجود را نیز باز می کند اما هیچ دستیابی برای مدیریت خطاهای پایگاه داده تعریف نمی کند
- (openOrCreateDatabase(String path, SQLiteDatabase.CursorFactory factory)
در این متد در صورت عدم وجود پایگاه داده، نه تنها باز می شود بلکه ایجاد می شود. این متد معادل روش openDatabase است.
- (openOrCreateDatabase(File file, SQLiteDatabase.CursorFactory factory
این متد مشابه متد فوق است اما File را به عنوان یک مسیر و نه یک رشته می گیرد. معادل متد () file.getPath است
درج در پایگاه داده
ما می توانیم جدول ایجاد کنیم یا داده ها را با استفاده از روش execSQL که در کلاس SQLiteDatabase تعریف شده است، وارد جدول کنیم. نحو آن در زیر آورده شده است:
|
1 2 |
mydatabase.execSQL("CREATE TABLE IF NOT EXISTS TutorialsPoint(Username VARCHAR,Password VARCHAR);"); mydatabase.execSQL("INSERT INTO TutorialsPoint VALUES('admin','admin');"); |
با این کار مقادیری در جدول ما در پایگاه داده قرار می گیرد.
متد دیگری که همان کار را انجام می دهد اما برخی از پارامترهای اضافی را نیز در بر دارد ، در زیر آورده شده است
- (execSQL(String sql, Object[] bindArgs
این متد نه تنها داده ها را درج می کند، بلکه برای به روزرسانی یا اصلاح داده های موجود موجود در پایگاه داده با استفاده از آرگومان های bind نیز عمل می کند
واکشی داده ها در پایگاه داده
ما می توانیم هر چیزی را با استفاده از یک شی از کلاس Cursor از پایگاه داده بازیابی کنیم.
ما متدی از این کلاس به نام rawQuery را فراخوانی خواهیم کرد و آن نتایج را با Cursor به جدول برمی گرداند. می توانیم از Cursor برای بازیابی داده ها نیز استفاده کنیم.
|
1 2 3 4 |
Cursor resultSet = mydatbase.rawQuery("Select * from TutorialsPoint",null); resultSet.moveToFirst(); String username = resultSet.getString(0); String password = resultSet.getString(1); |
توابع دیگری نیز در کلاس Cursor موجود است که به ما امکان می دهد داده ها را به طور موثر بازیابی کنیم. که شامل موارد زیر می باشند:
- ()getColumnCount
این متد تعداد کل ستونهای جدول را برمی گرداند.
- (getColumnIndex(String columnName
این متد با مشخص کردن نام ستون ، شماره شاخص یک ستون را برمی گرداند
- (getColumnName (int columnIndex
این متد با تعیین شاخص ستون نام ستون را برمی گرداند
- ()getColumnNames
این متد آرایه تمام ستون های جدول را برمی گرداند.
- ()getCount
این متد تعداد کل ردیف های Cursor را برمی گرداند
- ()getPosition
این متد موقعیت فعلی Cursor را در جدول برمی گرداند
- ()isClosed
اگر cursor بسته شده باشد این متد True را برمی گرداند در غیر این صورت false برمی گداند.
کلاس helper در پایگاه داده
برای مدیریت کلیه عملیات مربوط به پایگاه داده، یک کلاس helper داده شده است که SQLiteOpenHelper نامیده می شود.
این به طور خودکار ایجاد و به روز رسانی پایگاه داده را مدیریت می کند. نحو آن در زیر آورده شده است:
|
1 2 3 4 5 6 7 |
public class DBHelper extends SQLiteOpenHelper { public DBHelper(){ super(context,DATABASE_NAME,null,1); } public void onCreate(SQLiteDatabase db) {} public void onUpgrade(SQLiteDatabase database, int oldVersion, int newVersion) {} } |
مثال
در اینجا مثالی برای استفاده از پایگاه داده SQLite در برنامه نویسی اندروید آورده شده است. این برنامه کاربردی اجازه درج، حذف و تغییر مخاطب را می دهد.
برای آزمایش این مثال، باید این مورد را روی دستگاه واقعی که دوربین بر روی آن پشتیبانی می شود، اجرا کنید.
شرح مراحل
1- شما برای ایجاد یک برنامه اندروید تحت یک پکیج com.example.sairamkrishna.myapplication از Android studio استفاده خواهید کرد.
2- پرونده src / MainActivity.java را تغییر دهید تا از تمام اجزای XML منابع گرفته شود و مخاطبین موجود در listView را پر کنید.
3- src / DBHelper.java جدید ایجاد کنید که کار پایگاه داده را مدیریت کند
4- یک فعالیت جدید به عنوان DisplayContact.java ایجاد کنید که مخاطب را روی صفحه نمایش دهد
5- res / layout / activity_main را تغییر دهید تا مولفه های XML مربوطه اضافه شود
6- res / layout / activity_display_contact.xml را تغییر دهید تا مولفه های XML مربوطه اضافه شود
7- برای افزودن اجزای لازم رشته، Res / Value / String.xml را تغییر دهید
8- برای افزودن اجزای لازم منو، res / menu / display_contact.xml را تغییر دهید
9- یک منوی جدید به عنوان res / menu / mainmenu.xml ایجاد کنید تا گزینه مخاطب درج را اضافه کنید
10- برنامه را اجرا کنید و دستگاه اندرویدی در حال اجرا را انتخاب کنید و برنامه را روی آن نصب کنید و نتایج را بررسی کنید.
در زیر محتوای MainActivity.java اصلاح شده آورده شده است.
|
1 2 3 4 5 6 7 8 9 10 11 12 13 14 15 16 17 18 19 20 21 22 23 24 25 26 27 28 29 30 31 32 33 34 35 36 37 38 39 40 41 42 43 44 45 46 47 48 49 50 51 52 53 54 55 56 57 58 59 60 61 62 63 64 65 66 67 68 69 70 71 72 73 74 75 76 77 78 79 80 81 82 83 84 85 |
package com.example.sairamkrishna.myapplication; import android.content.Context; import android.content.Intent; import android.support.v7.app.ActionBarActivity; import android.os.Bundle; import android.view.KeyEvent; import android.view.Menu; import android.view.MenuItem; import android.view.View; import android.widget.AdapterView; import android.widget.ArrayAdapter; import android.widget.AdapterView.OnItemClickListener; import android.widget.ListView; import java.util.ArrayList; import java.util.List; public class MainActivity extends ActionBarActivity { public final static String EXTRA_MESSAGE = "MESSAGE"; private ListView obj; DBHelper mydb; @Override protected void onCreate(Bundle savedInstanceState) { super.onCreate(savedInstanceState); setContentView(R.layout.activity_main); mydb = new DBHelper(this); ArrayList array_list = mydb.getAllCotacts(); ArrayAdapter arrayAdapter=new ArrayAdapter(this,android.R.layout.simple_list_item_1, array_list); obj = (ListView)findViewById(R.id.listView1); obj.setAdapter(arrayAdapter); obj.setOnItemClickListener(new OnItemClickListener(){ @Override public void onItemClick(AdapterView<?> arg0, View arg1, int arg2,long arg3) { // TODO Auto-generated method stub int id_To_Search = arg2 + 1; Bundle dataBundle = new Bundle(); dataBundle.putInt("id", id_To_Search); Intent intent = new Intent(getApplicationContext(),DisplayContact.class); intent.putExtras(dataBundle); startActivity(intent); } }); } @Override public boolean onCreateOptionsMenu(Menu menu) { // Inflate the menu; this adds items to the action bar if it is present. getMenuInflater().inflate(R.menu.menu_main, menu); return true; } @Override public boolean onOptionsItemSelected(MenuItem item){ super.onOptionsItemSelected(item); switch(item.getItemId()) { case R.id.item1:Bundle dataBundle = new Bundle(); dataBundle.putInt("id", 0); Intent intent = new Intent(getApplicationContext(),DisplayContact.class); intent.putExtras(dataBundle); startActivity(intent); return true; default: return super.onOptionsItemSelected(item); } } public boolean onKeyDown(int keycode, KeyEvent event) { if (keycode == KeyEvent.KEYCODE_BACK) { moveTaskToBack(true); } return super.onKeyDown(keycode, event); } } |
در زیر محتوای تغییر یافته فعالیت تماس با صفحه نمایش DisplayContact.java است
|
1 2 3 4 5 6 7 8 9 10 11 12 13 14 15 16 17 18 19 20 21 22 23 24 25 26 27 28 29 30 31 32 33 34 35 36 37 38 39 40 41 42 43 44 45 46 47 48 49 50 51 52 53 54 55 56 57 58 59 60 61 62 63 64 65 66 67 68 69 70 71 72 73 74 75 76 77 78 79 80 81 82 83 84 85 86 87 88 89 90 91 92 93 94 95 96 97 98 99 100 101 102 103 104 105 106 107 108 109 110 111 112 113 114 115 116 117 118 119 120 121 122 123 124 125 126 127 128 129 130 131 132 133 134 135 136 137 138 139 140 141 142 143 144 145 146 147 148 149 150 151 152 153 154 155 156 157 158 159 160 161 162 163 164 165 166 167 168 169 170 171 172 173 174 175 176 177 178 179 180 181 182 183 184 185 186 187 188 189 |
package com.example.sairamkrishna.myapplication; import android.os.Bundle; import android.app.Activity; import android.app.AlertDialog; import android.content.DialogInterface; import android.content.Intent; import android.database.Cursor; import android.view.Menu; import android.view.MenuItem; import android.view.View; import android.widget.Button; import android.widget.TextView; import android.widget.Toast; public class DisplayContact extends Activity { int from_Where_I_Am_Coming = 0; private DBHelper mydb ; TextView name ; TextView phone; TextView email; TextView street; TextView place; int id_To_Update = 0; @Override protected void onCreate(Bundle savedInstanceState) { super.onCreate(savedInstanceState); setContentView(R.layout.activity_display_contact); name = (TextView) findViewById(R.id.editTextName); phone = (TextView) findViewById(R.id.editTextPhone); email = (TextView) findViewById(R.id.editTextStreet); street = (TextView) findViewById(R.id.editTextEmail); place = (TextView) findViewById(R.id.editTextCity); mydb = new DBHelper(this); Bundle extras = getIntent().getExtras(); if(extras !=null) { int Value = extras.getInt("id"); if(Value>0){ //means this is the view part not the add contact part. Cursor rs = mydb.getData(Value); id_To_Update = Value; rs.moveToFirst(); String nam = rs.getString(rs.getColumnIndex(DBHelper.CONTACTS_COLUMN_NAME)); String phon = rs.getString(rs.getColumnIndex(DBHelper.CONTACTS_COLUMN_PHONE)); String emai = rs.getString(rs.getColumnIndex(DBHelper.CONTACTS_COLUMN_EMAIL)); String stree = rs.getString(rs.getColumnIndex(DBHelper.CONTACTS_COLUMN_STREET)); String plac = rs.getString(rs.getColumnIndex(DBHelper.CONTACTS_COLUMN_CITY)); if (!rs.isClosed()) { rs.close(); } Button b = (Button)findViewById(R.id.button1); b.setVisibility(View.INVISIBLE); name.setText((CharSequence)nam); name.setFocusable(false); name.setClickable(false); phone.setText((CharSequence)phon); phone.setFocusable(false); phone.setClickable(false); email.setText((CharSequence)emai); email.setFocusable(false); email.setClickable(false); street.setText((CharSequence)stree); street.setFocusable(false); street.setClickable(false); place.setText((CharSequence)plac); place.setFocusable(false); place.setClickable(false); } } } @Override public boolean onCreateOptionsMenu(Menu menu) { // Inflate the menu; this adds items to the action bar if it is present. Bundle extras = getIntent().getExtras(); if(extras !=null) { int Value = extras.getInt("id"); if(Value>0){ getMenuInflater().inflate(R.menu.display_contact, menu); } else{ getMenuInflater().inflate(R.menu.menu_main menu); } } return true; } public boolean onOptionsItemSelected(MenuItem item) { super.onOptionsItemSelected(item); switch(item.getItemId()) { case R.id.Edit_Contact: Button b = (Button)findViewById(R.id.button1); b.setVisibility(View.VISIBLE); name.setEnabled(true); name.setFocusableInTouchMode(true); name.setClickable(true); phone.setEnabled(true); phone.setFocusableInTouchMode(true); phone.setClickable(true); email.setEnabled(true); email.setFocusableInTouchMode(true); email.setClickable(true); street.setEnabled(true); street.setFocusableInTouchMode(true); street.setClickable(true); place.setEnabled(true); place.setFocusableInTouchMode(true); place.setClickable(true); return true; case R.id.Delete_Contact: AlertDialog.Builder builder = new AlertDialog.Builder(this); builder.setMessage(R.string.deleteContact) .setPositiveButton(R.string.yes, new DialogInterface.OnClickListener() { public void onClick(DialogInterface dialog, int id) { mydb.deleteContact(id_To_Update); Toast.makeText(getApplicationContext(), "Deleted Successfully", Toast.LENGTH_SHORT).show(); Intent intent = new Intent(getApplicationContext(),MainActivity.class); startActivity(intent); } }) .setNegativeButton(R.string.no, new DialogInterface.OnClickListener() { public void onClick(DialogInterface dialog, int id) { // User cancelled the dialog } }); AlertDialog d = builder.create(); d.setTitle("Are you sure"); d.show(); return true; default: return super.onOptionsItemSelected(item); } } public void run(View view) { Bundle extras = getIntent().getExtras(); if(extras !=null) { int Value = extras.getInt("id"); if(Value>0){ if(mydb.updateContact(id_To_Update,name.getText().toString(), phone.getText().toString(), email.getText().toString(), street.getText().toString(), place.getText().toString())){ Toast.makeText(getApplicationContext(), "Updated", Toast.LENGTH_SHORT).show(); Intent intent = new Intent(getApplicationContext(),MainActivity.class); startActivity(intent); } else{ Toast.makeText(getApplicationContext(), "not Updated", Toast.LENGTH_SHORT).show(); } } else{ if(mydb.insertContact(name.getText().toString(), phone.getText().toString(), email.getText().toString(), street.getText().toString(), place.getText().toString())){ Toast.makeText(getApplicationContext(), "done", Toast.LENGTH_SHORT).show(); } else{ Toast.makeText(getApplicationContext(), "not done", Toast.LENGTH_SHORT).show(); } Intent intent = new Intent(getApplicationContext(),MainActivity.class); startActivity(intent); } } } } |
در زیر محتوای کلاس پایگاه داده DBHelper.java آمده است
|
1 2 3 4 5 6 7 8 9 10 11 12 13 14 15 16 17 18 19 20 21 22 23 24 25 26 27 28 29 30 31 32 33 34 35 36 37 38 39 40 41 42 43 44 45 46 47 48 49 50 51 52 53 54 55 56 57 58 59 60 61 62 63 64 65 66 67 68 69 70 71 72 73 74 75 76 77 78 79 80 81 82 83 84 85 86 87 88 89 90 91 92 93 94 95 96 97 98 99 100 101 102 |
package com.example.sairamkrishna.myapplication; import java.util.ArrayList; import java.util.HashMap; import java.util.Hashtable; import android.content.ContentValues; import android.content.Context; import android.database.Cursor; import android.database.DatabaseUtils; import android.database.sqlite.SQLiteOpenHelper; import android.database.sqlite.SQLiteDatabase; public class DBHelper extends SQLiteOpenHelper { public static final String DATABASE_NAME = "MyDBName.db"; public static final String CONTACTS_TABLE_NAME = "contacts"; public static final String CONTACTS_COLUMN_ID = "id"; public static final String CONTACTS_COLUMN_NAME = "name"; public static final String CONTACTS_COLUMN_EMAIL = "email"; public static final String CONTACTS_COLUMN_STREET = "street"; public static final String CONTACTS_COLUMN_CITY = "place"; public static final String CONTACTS_COLUMN_PHONE = "phone"; private HashMap hp; public DBHelper(Context context) { super(context, DATABASE_NAME , null, 1); } @Override public void onCreate(SQLiteDatabase db) { // TODO Auto-generated method stub db.execSQL( "create table contacts " + "(id integer primary key, name text,phone text,email text, street text,place text)" ); } @Override public void onUpgrade(SQLiteDatabase db, int oldVersion, int newVersion) { // TODO Auto-generated method stub db.execSQL("DROP TABLE IF EXISTS contacts"); onCreate(db); } public boolean insertContact (String name, String phone, String email, String street,String place) { SQLiteDatabase db = this.getWritableDatabase(); ContentValues contentValues = new ContentValues(); contentValues.put("name", name); contentValues.put("phone", phone); contentValues.put("email", email); contentValues.put("street", street); contentValues.put("place", place); db.insert("contacts", null, contentValues); return true; } public Cursor getData(int id) { SQLiteDatabase db = this.getReadableDatabase(); Cursor res = db.rawQuery( "select * from contacts where id="+id+"", null ); return res; } public int numberOfRows(){ SQLiteDatabase db = this.getReadableDatabase(); int numRows = (int) DatabaseUtils.queryNumEntries(db, CONTACTS_TABLE_NAME); return numRows; } public boolean updateContact (Integer id, String name, String phone, String email, String street,String place) { SQLiteDatabase db = this.getWritableDatabase(); ContentValues contentValues = new ContentValues(); contentValues.put("name", name); contentValues.put("phone", phone); contentValues.put("email", email); contentValues.put("street", street); contentValues.put("place", place); db.update("contacts", contentValues, "id = ? ", new String[] { Integer.toString(id) } ); return true; } public Integer deleteContact (Integer id) { SQLiteDatabase db = this.getWritableDatabase(); return db.delete("contacts", "id = ? ", new String[] { Integer.toString(id) }); } public ArrayList<String> getAllCotacts() { ArrayList<String> array_list = new ArrayList<String>(); //hp = new HashMap(); SQLiteDatabase db = this.getReadableDatabase(); Cursor res = db.rawQuery( "select * from contacts", null ); res.moveToFirst(); while(res.isAfterLast() == false){ array_list.add(res.getString(res.getColumnIndex(CONTACTS_COLUMN_NAME))); res.moveToNext(); } return array_list; } } |
در زیر محتوای res / layout / activity_main.xml آمده است
|
1 2 3 4 5 6 7 8 9 10 11 12 13 14 15 16 17 18 19 20 21 22 23 24 25 26 27 28 29 30 31 32 33 34 35 36 37 38 39 40 41 42 43 44 45 46 47 48 49 50 51 52 53 54 55 56 57 58 |
<?xml version="1.0" encoding="utf-8"?> <RelativeLayout xmlns:android="http://schemas.android.com/apk/res/android" xmlns:tools="http://schemas.android.com/tools" android:layout_width="match_parent" android:layout_height="match_parent" android:paddingLeft="@dimen/activity_horizontal_margin" android:paddingRight="@dimen/activity_horizontal_margin" android:paddingTop="@dimen/activity_vertical_margin" android:paddingBottom="@dimen/activity_vertical_margin" tools:context=".MainActivity"> <TextView android:layout_width="wrap_content" android:layout_height="wrap_content" android:id="@+id/textView" android:layout_alignParentTop="true" android:layout_centerHorizontal="true" android:textSize="30dp" android:text="Data Base" /> <TextView android:layout_width="wrap_content" android:layout_height="wrap_content" android:text="Tutorials Point" android:id="@+id/textView2" android:layout_below="@+id/textView" android:layout_centerHorizontal="true" android:textSize="35dp" android:textColor="#ff16ff01" /> <ImageView android:layout_width="wrap_content" android:layout_height="wrap_content" android:id="@+id/imageView" android:layout_below="@+id/textView2" android:layout_centerHorizontal="true" android:src="@drawable/logo"/> <ScrollView android:layout_width="wrap_content" android:layout_height="wrap_content" android:id="@+id/scrollView" android:layout_below="@+id/imageView" android:layout_alignParentLeft="true" android:layout_alignParentStart="true" android:layout_alignParentBottom="true" android:layout_alignParentRight="true" android:layout_alignParentEnd="true"> <ListView android:id="@+id/listView1" android:layout_width="match_parent" android:layout_height="wrap_content" android:layout_centerHorizontal="true" android:layout_centerVertical="true" > </ListView> </ScrollView> </RelativeLayout> |
در زیر محتوای res / layout / activity_display_contact.xml وجود دارد
|
1 2 3 4 5 6 7 8 9 10 11 12 13 14 15 16 17 18 19 20 21 22 23 24 25 26 27 28 29 30 31 32 33 34 35 36 37 38 39 40 41 42 43 44 45 46 47 48 49 50 51 52 53 54 55 56 57 58 59 60 61 62 63 64 65 66 67 68 69 70 71 72 73 74 75 76 77 78 79 80 81 82 83 84 85 86 87 88 89 90 91 92 93 94 95 96 97 98 99 100 101 102 103 104 105 106 107 108 109 110 111 112 113 114 115 116 117 118 119 120 121 122 123 124 125 126 127 |
<?xml version="1.0" encoding="utf-8"?> <ScrollView xmlns:android="http://schemas.android.com/apk/res/android" xmlns:tools="http://schemas.android.com/tools" android:id="@+id/scrollView1" android:layout_width="match_parent" android:layout_height="wrap_content" tools:context=".DisplayContact" > <RelativeLayout android:layout_width="match_parent" android:layout_height="370dp" android:paddingBottom="@dimen/activity_vertical_margin" android:paddingLeft="@dimen/activity_horizontal_margin" android:paddingRight="@dimen/activity_horizontal_margin" android:paddingTop="@dimen/activity_vertical_margin"> <EditText android:id="@+id/editTextName" android:layout_width="wrap_content" android:layout_height="wrap_content" android:layout_alignParentLeft="true" android:layout_marginTop="5dp" android:layout_marginLeft="82dp" android:ems="10" android:inputType="text" > </EditText> <EditText android:id="@+id/editTextEmail" android:layout_width="wrap_content" android:layout_height="wrap_content" android:layout_alignLeft="@+id/editTextStreet" android:layout_below="@+id/editTextStreet" android:layout_marginTop="22dp" android:ems="10" android:inputType="textEmailAddress" /> <TextView android:id="@+id/textView1" android:layout_width="wrap_content" android:layout_height="wrap_content" android:layout_alignBottom="@+id/editTextName" android:layout_alignParentLeft="true" android:text="@string/name" android:textAppearance="?android:attr/textAppearanceMedium" /> <Button android:id="@+id/button1" android:layout_width="wrap_content" android:layout_height="wrap_content" android:layout_alignLeft="@+id/editTextCity" android:layout_alignParentBottom="true" android:layout_marginBottom="28dp" android:onClick="run" android:text="@string/save" /> <TextView android:id="@+id/textView2" android:layout_width="wrap_content" android:layout_height="wrap_content" android:layout_alignBottom="@+id/editTextEmail" android:layout_alignLeft="@+id/textView1" android:text="@string/email" android:textAppearance="?android:attr/textAppearanceMedium" /> <TextView android:id="@+id/textView5" android:layout_width="wrap_content" android:layout_height="wrap_content" android:layout_alignBottom="@+id/editTextPhone" android:layout_alignLeft="@+id/textView1" android:text="@string/phone" android:textAppearance="?android:attr/textAppearanceMedium" /> <TextView android:id="@+id/textView4" android:layout_width="wrap_content" android:layout_height="wrap_content" android:layout_above="@+id/editTextEmail" android:layout_alignLeft="@+id/textView5" android:text="@string/street" android:textAppearance="?android:attr/textAppearanceMedium" /> <EditText android:id="@+id/editTextCity" android:layout_width="wrap_content" android:layout_height="wrap_content" android:layout_alignRight="@+id/editTextName" android:layout_below="@+id/editTextEmail" android:layout_marginTop="30dp" android:ems="10" android:inputType="text" /> <TextView android:id="@+id/textView3" android:layout_width="wrap_content" android:layout_height="wrap_content" android:layout_alignBaseline="@+id/editTextCity" android:layout_alignBottom="@+id/editTextCity" android:layout_alignParentLeft="true" android:layout_toLeftOf="@+id/editTextEmail" android:text="@string/country" android:textAppearance="?android:attr/textAppearanceMedium" /> <EditText android:id="@+id/editTextStreet" android:layout_width="wrap_content" android:layout_height="wrap_content" android:layout_alignLeft="@+id/editTextName" android:layout_below="@+id/editTextPhone" android:ems="10" android:inputType="text" > <requestFocus /> </EditText> <EditText android:id="@+id/editTextPhone" android:layout_width="wrap_content" android:layout_height="wrap_content" android:layout_alignLeft="@+id/editTextStreet" android:layout_below="@+id/editTextName" android:ems="10" android:inputType="phone|text" /> </RelativeLayout> </ScrollView> |
در زیر محتوای res / value / string.xml آمده است
|
1 2 3 4 5 6 7 8 9 10 11 12 13 14 15 16 17 18 19 |
<?xml version="1.0" encoding="utf-8"?> <resources> <string name="app_name">Address Book</string> <string name="action_settings">Settings</string> <string name="hello_world">Hello world!</string> <string name="Add_New">Add New</string> <string name="edit">Edit Contact</string> <string name="delete">Delete Contact</string> <string name="title_activity_display_contact">DisplayContact</string> <string name="name">Name</string> <string name="phone">Phone</string> <string name="email">Email</string> <string name="street">Street</string> <string name="country">City/State/Zip</string> <string name="save">Save Contact</string> <string name="deleteContact">Are you sure, you want to delete it.</string> <string name="yes">Yes</string> <string name="no">No</string> </resources> |
در زیر محتوای res / menu / main_menu.xml آمده است
|
1 2 3 4 5 6 7 8 9 |
<?xml version="1.0" encoding="utf-8"?> <menu xmlns:android="http://schemas.android.com/apk/res/android" > <item android:id="@+id/item1" android:icon="@drawable/add" android:title="@string/Add_New" > </item> </menu> |
در زیر محتوای res / menu / display_contact.xml آمده است
|
1 2 3 4 5 6 7 8 9 10 11 12 13 |
<?xml version="1.0" encoding="utf-8"?> <menu xmlns:android="http://schemas.android.com/apk/res/android" > <item android:id="@+id/Edit_Contact" android:orderInCategory="100" android:title="@string/edit"/> <item android:id="@+id/Delete_Contact" android:orderInCategory="100" android:title="@string/delete"/> </menu> |
این AndroidManifest.xml پیش فرض این پروژه است
|
1 2 3 4 5 6 7 8 9 10 11 12 13 14 15 16 17 18 19 20 21 22 23 24 25 |
<?xml version="1.0" encoding="utf-8"?> <manifest xmlns:android="http://schemas.android.com/apk/res/android" package="com.example.sairamkrishna.myapplication" > <application android:allowBackup="true" android:icon="@mipmap/ic_launcher" android:label="@string/app_name" android:theme="@style/AppTheme" > <activity android:name=".MainActivity" android:label="@string/app_name" > <intent-filter> <action android:name="android.intent.action.MAIN" /> <category android:name="android.intent.category.LAUNCHER" /> </intent-filter> </activity> <activity android:name=".DisplayContact"/> </application> </manifest> |
بیایید برنامه خود را اجرا کنیم! من تصور می کنم شما AVD خود را هنگام راه اندازی محیط ایجاد کرده اید. برای اجرای برنامه از Android studio، یکی از پرونده های فعالیت پروژه خود را باز کنید و از نوار ابزار روی  کلیک کنید. Android Studio برنامه را روی AVD شما نصب کرده و شروع به کار می کند و اگر با تنظیمات و برنامه هایتان همه چیز خوب باشد، زیر پنجره شبیه ساز نمایش داده می شود.
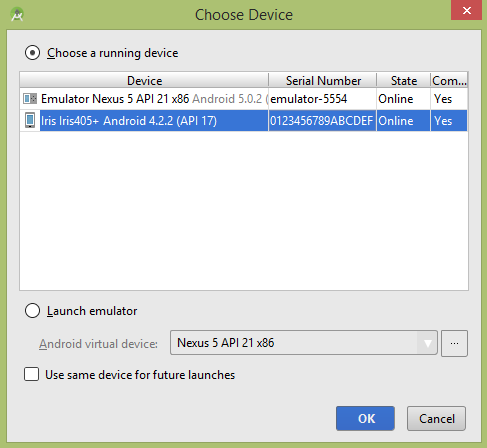
دستگاه همراه خود را به عنوان گزینه انتخاب کنید و سپس دستگاه همراه خود را که در زیر صفحه نمایش داده می شود بررسی کنید
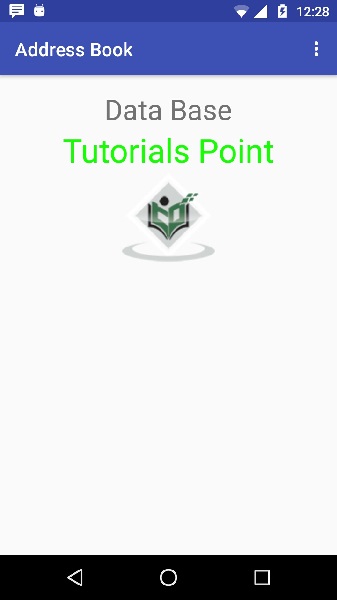
اکنون منوی خود را باز کنید، مانند تصویر زیر نشان داده می شود: منو در نسخه های مختلف اندروید در مکان های مختلف ظاهر می شود
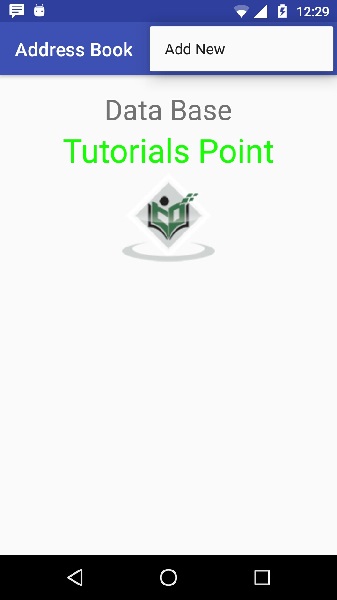
برای افزودن مخاطب جدید، روی دکمه add a new contact کلیک کنید. این صفحه زیر را نشان می دهد
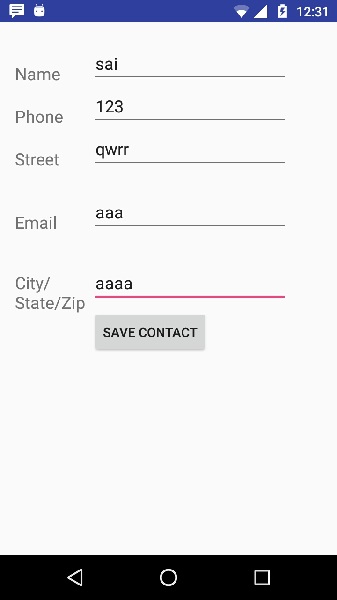
این فیلد های زیر را نشان می دهد. لطفاً اطلاعات لازم را وارد کنید و روی save contact کلیک کنید. این شما را به صفحه اصلی باز می گرداند
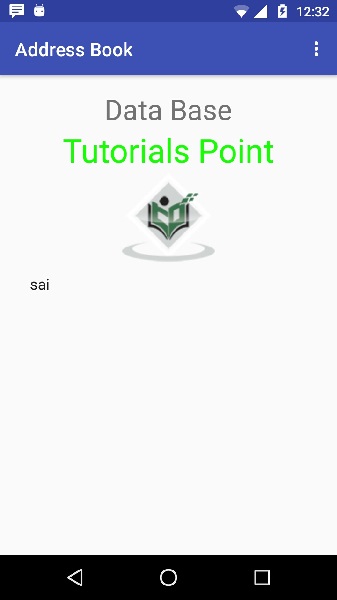
اکنون sai به مخاطب های ما اضافه شده است.
برای دیدن اینکه پایگاه داده شما کجا ایجاد شده است. android studio خود را باز کنید ، تلفن همراه خود را متصل کنید. مسیر tools/android/android device monitor را دنبال کنید.
حالا تب File explorer را باز کنید. اکنون این پوشه /data/data/<your.package.name>/databases <database-name> را بررسی کنید.
لیست جلسات قبل آموزش برنامه نویسی اندروید
-
- نگاهی کلی به برنامه نویسی اندروید
- تنظیمات محیط در برنامه نویسی اندروید
- معماری برنامه نویسی اندروید
- اجزای برنامه در برنامه نویسی اندروید
- Hello World در برنامه نویسی اندروید
- سازماندهی و دسترسی به منابع در برنامه نویسی اندروید
- فعالیت در برنامه نویسی اندروید
- سرویس در برنامه نویسی اندروید
- گیرنده های پخش در برنامه نویسی اندروید
- ارائه دهنده محتوا در برنامه نویسی اندروید
- قطعات در برنامه نویسی اندروید
- Intent و فیلتر در برنامه نویسی اندروید
- طرح بندی رابط کاربری در برنامه نویسی اندروید
- کنترل های رابط کاربری در برنامه نویسی اندروید
- مدیریت رویدادها در برنامه نویسی اندروید
- استایل و تم ها در برنامه نویسی اندروید
- اجزای سفارشی در برنامه نویسی اندروید
- کشیدن و رها کردن در برنامه نویسی اندروید
- نوتیفیکیشن ها در برنامه نویسی اندروید
- سرویس های مبتنی بر مکان در برنامه نویسی اندروید
- ارسال ایمیل در برنامه نویسی اندروید
- ارسال پیامک در برنامه نویسی اندروید
- تماس های تلفنی در برنامه نویسی اندروید
- انتشار برنامه اندروید
- آموزش Alert Dialog در برنامه نویسی اندروید
- انیمیشن در برنامه نویسی اندروید
- ضبط صدا در برنامه نویسی اندروید
- مدیریت صدا در برنامه نویسی اندروید
- آموزش Auto Complete در برنامه نویسی اندروید
- بهترین شیوه ها در برنامه نویسی اندروید
- بلوتوث در برنامه نویسی اندروید
- استفاده از دوربین در برنامه نویسی اندروید
- کلیپ بورد در برنامه نویسی اندروید
- فونت سفارشی در برنامه نویسی اندروید
- پشتیبان گیری از داده ها در برنامه نویسی اندروید
- ابزارهای توسعه دهنده در برنامه نویسی اندروید
- آموزش شبیه ساز در برنامه نویسی اندروید
- اتصال به فیس بوک در برنامه نویسی اندروید
- حرکات لمسی در برنامه نویسی اندروید
- آموزش گوگل مپ در برنامه نویسی اندروید
- افکت های تصویر در برنامه نویسی اندروید
- Image Switcher در برنامه نویسی اندروید
- حافظه داخلی در برنامه نویسی اندروید
- آموزش کار با JetPlayer در برنامه نویسی اندروید
- JSON Parser در برنامه نویسی اندروید
- ارتباط با LinkedIn در برنامه نویسی اندروید
- نوار پیشرفت Spinner در برنامه نویسی اندروید
- بومی سازی در برنامه نویسی اندروید
- صفحه Login در برنامه نویسی اندروید
- MediaPlayer در برنامه نویسی اندروید
- Multitouch در برنامه نویسی اندروید
- Navigation در برنامه نویسی اندروید
- اتصال به اینترنت در برنامه نویسی اندروید
- NFC در برنامه نویسی اندروید
- PHP و MYSQL در برنامه نویسی اندروید
- Progress Circle دربرنامه نویسی اندروید
- Progress Bar در برنامه نویسی اندروید
- Push Notification در برنامه نویسی اندروید
- RenderScript در برنامه نویسی اندروید
- RSS Reader در برنامه نویسی اندروید
- Screen cast در برنامه نویسی اندروید
- SDK Manager در برنامه نویسی اندروید
- سنسورها در برنامه نویسی اندروید
- Session در برنامه نویسی اندروید
- Shared Preferences در برنامه نویسی اندروید
- پروتکل SIP در برنامه نویسی اندروید
- Spelling Checker در برنامه نویسی اندروید


.svg)
دیدگاه شما