
آموزش اکشن ها و رویدادها در گوگل AMP

آموزش اکشن ها و رویدادها در گوگل AMP
در این درس از مجموعه آموزش برنامه نویسی سایت سورس باران، به آموزش اکشن ها و رویدادها در گوگل AMP خواهیم پرداخت.
برای استفاده از اکشن ها یا رویدادها روی یک قطعه AMP، می توانیم از ویژگی on استفاده کنیم. در این درس، اجازه دهید به طور مفصل در مورد آنها بحث کنیم.
رویداد ها
نحو کار با رویدادها به شرح زیر است –
|
1 |
on = "eventName:elementId[.methodName[(arg1 = value, arg2 = value)]]" |
جزئیات منتسب به ویژگی on به شرح زیر است –
- eventName – این نام رویدادی است که برای مولفه amp موجود است. به عنوان مثال ، برای فرم ها می توانیم ازsubmit-success, submit-error eventNames استفاده کنیم.
- elementId – این شناسه عنصری را می گیرد که رویداد باید روی آن فراخوانی شود. این می تواند شناسه شکلی باشد که می خواهیم در مورد موفقیت یا خطا بدانیم.
- MethodName – این نام متدی است که باید در آن رویداد فراخوانی شود.
- arg=value – این آرگومان ها را با فرم key=value منتقل شده به روش می گیرد.
همچنین می توان چندین رویداد را به ویژگی on منتقل کرد و به صورت زیر انجام می شود –
|
1 |
on = "submit-success:lightbox;submit-error:lightbox1" |
اگر چندین رویداد وجود داشته باشد، آنها به ویژگی on منتقل می شوند و با استفاده از نقطه ویرگول (؛) از هم جدا می شوند.
اکشن ها
اکشن ها اساساً با ویژگی استفاده می شوند و نحو به شرح زیر است:
|
1 |
on = "tab: elementid.hide؛" |
ما می توانیم چندین اکشن را به شرح زیر انجام دهیم –
|
1 |
on = "tab: elementid.open؛ tab: elementid.hide؛" |
Elementid شناسه عنصری است که قرار است عمل بر روی آن انجام شود.
Amp دارای برخی رویدادها و اکشن های تعریف شده در سطح جهانی است که می تواند در هر مولفه Amp استفاده شود و آنها عبارتند از رویداد ضربه بزنید و اقدامات پنهان ، نشان داده و قابل تغییر هستند.
اگر می خواهید از قابلیت html یا amp برای پنهان کردن / نمایش یا استفاده از قابلیت تغییر قابلیت استفاده کنید ، می توانید از گزینه = “tap: elementid. [hide / show / togglevisibility]” استفاده کنید
بیایید چند نمونه مثال را برای رویدادها و اکشن ها مشاهده کنیم.
در عنصر ورودی
بگذارید با کمک یک مثال مفید این موضوع را بهتر درک کنیم –
مثال
|
1 2 3 4 5 6 7 8 9 10 11 12 13 14 15 16 17 18 19 20 21 22 23 24 25 26 27 28 29 30 31 32 33 34 35 36 37 38 39 40 41 42 43 44 45 46 47 48 49 50 51 52 53 54 55 56 57 58 59 60 61 62 63 64 65 66 67 68 69 70 71 72 73 74 75 76 77 78 79 80 81 82 83 84 85 86 87 88 89 90 91 |
<!doctype html> <html amp lang = "en"> <head> <meta charset = "utf-8"> <script async src = "https://cdn.ampproject.org/v0.js"></script> <title>Google AMP - Amp Bind</title> <link rel = "canonical" href = "http://example.ampproject.org/article-metadata.html"> <meta name = "viewport" content = "width = device-width,minimum-scale = 1,initial-scale = 1"> <style amp-boilerplate> body{ -webkit-animation: -amp-start 8s steps(1,end) 0s 1 normal both;-moz-animation: -amp-start 8s steps(1,end) 0s 1 normal both;-ms-animation: -amp-start 8s steps(1,end) 0s 1 normal both;animation: -amp-start 8s steps(1,end) 0s 1 normal both } @-webkit-keyframes -amp-start{from{visibility:hidden}to{visibility:visible}}@-moz-keyframes -amp-start{from{visibility:hidden}to{visibility:visible}}@-ms-keyframes -amp-start{from{visibility:hidden}to{visibility:visible}}@-o-keyframes -amp-start{from{visibility:hidden}to{visibility:visible}}@keyframes -amp-start{from{visibility:hidden}to{visibility:visible}} </style> <noscript> <style amp-boilerplate> body { -webkit-animation:none; -moz-animation:none; -ms-animation:none; animation:none } </style> </noscript> <script async custom-element = "amp-bind" src = " https://cdn.ampproject.org/v0/amp-bind-0.1.js"> </script> <script async custom-element = "amp-lightbox" src = " https://cdn.ampproject.org/v0/amp-lightbox-0.1.js"> </script> <style amp-custom> button{ background-color: #ACAD5C; color: white; padding: 12px 20px; border: none; border-radius: 4px; cursor: pointer; float: left;} .lightbox { background: rgba(211,211,211,0.8); width: 100%; height: 100%; position: absolute; display: flex; align-items: center; justify-content: center; } #txtname{ width: 100%; padding: 12px 20px; margin: 8px 0; display: inline-block; border: 1px solid #ccc; border-radius: 4px; box-sizing: border-box; } div { font-size:25px; } </style> </head> <body> <h3>Google AMP - Amp Bind</h3> <button on = "tap:AMP.setState({displaylightbox: true})"> Click Here </button> <br/> <br/> <h3>AMP - Input Element</h3> <input id = "txtname" placeholder = "Type here" on = "input-throttled:AMP.setState({name: event.value})"> <div [text] = "name"></div> </body> </html> |
خروجی
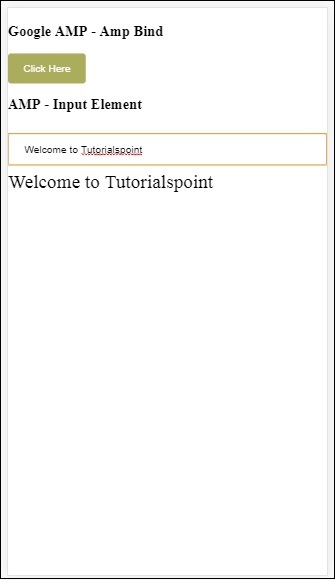
توجه داشته باشید که در مثال بالا، ما از رویداد در قسمت ورودی به شرح زیر استفاده می کنیم –
|
1 2 |
<input id = "txtname" placeholder = "Type here" on = "input-throttled:AMP.setState({name: event.value})"> |
رویداد مورد استفاده input-throlled است.
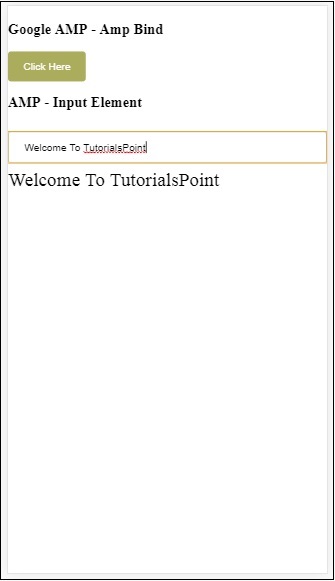
ما همچنین می توانیم از تغییر به شرح زیر استفاده کنیم –
|
1 2 |
<input id = "txtname" placeholder = "Type here" on = "change:AMP.setState({name: event.value})"> |
هنگامی که کاربر از جعبه ورودی خارج شد، خروجی نمایش داده می شود. ما می توانیم از تغییر رویداد در نوع ورودی به عنوان رادیو ، کادر تأیید و غیره و همچنین در انتخاب عنصر استفاده کنیم.
|
1 2 |
<input id = "txtname" placeholder = "Type here" on = "input-debounced:AMP.setState({name: event.value})"> |
ورودی رویداد با توجه به تغییر همان تغییر است اما خروجی پس از 300 میلی ثانیه بعد از تایپ کاربر مشاهده می شود.
مثال
|
1 2 3 4 5 6 7 8 9 10 11 12 13 14 15 16 17 18 19 20 21 22 23 24 25 26 27 28 29 30 31 32 33 34 35 36 37 38 39 40 41 42 43 44 45 46 47 48 49 50 51 52 53 54 55 56 57 58 59 60 61 62 63 64 65 66 67 68 69 70 71 72 73 74 75 76 77 78 79 80 81 82 83 84 85 86 87 88 |
<!doctype html> <html amp lang = "en"> <head> <meta charset = "utf-8"> <script async src = "https://cdn.ampproject.org/v0.js"></script> <title>Google AMP - Amp Bind</title> <link rel = "canonical" href = " http://example.ampproject.org/article-metadata.html"> <meta name = "viewport" content = "width = device-width,minimum-scale = 1,initial-scale = 1"> <style amp-boilerplate> body{ -webkit-animation: -amp-start 8s steps(1,end) 0s 1 normal both;-moz-animation: -amp-start 8s steps(1,end) 0s 1 normal both;-ms-animation: -amp-start 8s steps(1,end) 0s 1 normal both;animation: -amp-start 8s steps(1,end) 0s 1 normal both } @-webkit-keyframes -amp-start{from{visibility:hidden}to{visibility:visible}}@-moz-keyframes -amp-start{from{visibility:hidden}to{visibility:visible}}@-ms-keyframes -amp-start{from{visibility:hidden}to{visibility:visible}}@-o-keyframes -amp-start{from{visibility:hidden}to{visibility:visible}}@keyframes -amp-start{from{visibility:hidden}to{visibility:visible}} </style> <noscript> <style amp-boilerplate> body{ -webkit-animation:none; -moz-animation:none; -ms-animation:none; animation:none} </style> </noscript> <script async custom-element = "amp-bind" src = "https://cdn.ampproject.org/v0/amp-bind-0.1.js"> </script> <script async custom-element = "amp-lightbox" src = "https://cdn.ampproject.org/v0/amp-lightbox-0.1.js"> </script> <style amp-custom> button{ background-color: #ACAD5C; color: white; padding: 12px 20px; border: none; border-radius: 4px; cursor: pointer; float: left; } .lightbox { background: rgba(211,211,211,0.8); width: 100%; height: 100%; position: absolute; display: flex; align-items: center; justify-content: center; } #txtname{ width: 100%; padding: 12px 20px; margin: 8px 0; display: inline-block; border: 1px solid #ccc; border-radius: 4px; box-sizing: border-box; } div { font-size:25px; } </style> </head> <body> <h3>Google AMP - Amp Bind</h3> <button on = "tap:AMP.setState({displaylightbox: true})"> Click Here </button> <br/> <br/> <h3>AMP - Input Element</h3> <input id = "txtname" placeholder = "Type here" on = "input-debounced:AMP.setState({name: event.value})"> <div [text] = "name"></div> </body> </html> |
خروجی
Amp Lightbox
در این بخش ما قصد داریم رویدادهای زیر را در lightbox آزمایش کنیم –
- lightboxOpen
- lightboxClose
مثال
|
1 2 3 4 5 6 7 8 9 10 11 12 13 14 15 16 17 18 19 20 21 22 23 24 25 26 27 28 29 30 31 32 33 34 35 36 37 38 39 40 41 42 43 44 45 46 47 48 49 50 51 52 53 54 55 56 57 58 59 60 61 62 63 64 65 66 67 68 69 70 71 72 73 74 75 76 77 78 79 80 81 82 83 84 85 86 87 88 89 90 |
<!doctype html> <html amp lang = "en"> <head> <meta charset = "utf-8"> <script async src = "https://cdn.ampproject.org/v0.js"></script> <title>Google AMP - Amp Lightbox</title> <link rel = "canonical" href = " http://example.ampproject.org/article-metadata.html"> <meta name = "viewport" content = "width = device-width,minimum-scale = 1,initial-scale = 1"> <style amp-boilerplate> body{ -webkit-animation: -amp-start 8s steps(1,end) 0s 1 normal both;-moz-animation: -amp-start 8s steps(1,end) 0s 1 normal both;-ms-animation: -amp-start 8s steps(1,end) 0s 1 normal both;animation: -amp-start 8s steps(1,end) 0s 1 normal both } @-webkit-keyframes -amp-start{from{visibility:hidden}to{visibility:visible}}@-moz-keyframes -amp-start{from{visibility:hidden}to{visibility:visible}}@-ms-keyframes -amp-start{from{visibility:hidden}to{visibility:visible}}@-o-keyframes -amp-start{from{visibility:hidden}to{visibility:visible}}@keyframes -amp-start{from{visibility:hidden}to{visibility:visible}} </style> <noscript> <style amp-boilerplate> body{ -webkit-animation:none; -moz-animation:none; -ms-animation:none; animation:none} </style> </noscript> <script async custom-element = "amp-bind" src = "https://cdn.ampproject.org/v0/amp-bind-0.1.js"> </script> <script async custom-element = "amp-lightbox" src = "https://cdn.ampproject.org/v0/amp-lightbox-0.1.js"> </script> <style amp-custom> amp-img { border: 1px solid #ddd; border-radius: 4px; padding: 5px; } button { background-color: #ACAD5C; color: white; padding: 12px 20px; border: none; border-radius: 4px; cursor: pointer; float: left; } .lightbox { background: rgba(211,211,211,0.8); width: 100%; height: 100%; position: absolute; display: flex; align-items: center; justify-content: center; } p{font-size:30px;} </style> </head> <body> <h3>Google AMP - Amp Lightbox</h3> <p [text] = "'Lightbox is ' + lightboxstatus + '.'"> Lightbox Event Testing </p> <button on = "tap:my-lightbox.open"> Show LightBox </button> <amp-lightbox id = "my-lightbox" layout = "nodisplay" close-button on = "lightboxOpen:AMP.setState({lightboxstatus:'opened'}); lightboxClose:AMP.setState({lightboxstatus:'closed'});"> <div class = "lightbox"> <amp-img alt = "Beautiful Flower" src = "images/loreal.gif" width = "246" height = "205"> </amp-img> </div> </amp-lightbox> </body> </html> |
خروجی
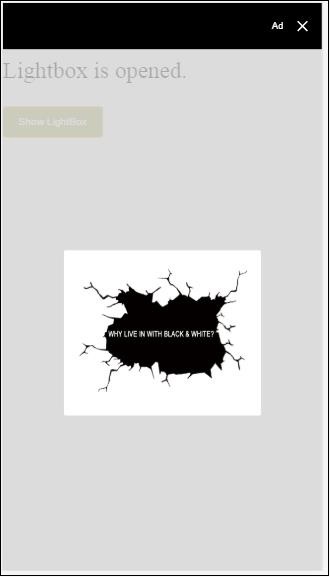
کد زیر نحوه اجرای باز و بسته شدن رویدادها را در سبد نشان می دهد –
|
1 2 3 4 5 6 7 8 9 10 11 12 13 |
<p [text]="'Lightbox is ' + lightboxstatus + '.'">Lightbox Event Testing</p> <button on = "tap:my-lightbox.open">Show LightBox</button> <amp-lightbox id = "my-lightbox" layout = "nodisplay" close-button on = "lightboxOpen:AMP.setState({lightboxstatus:'opened'}); lightboxClose:AMP.setState({lightboxstatus:'closed'});"> <div class = "lightbox"> <amp-img alt = "Beautiful Flower" src = "images/loreal.gif" width = "246" height = "205"> </amp-img> </div> </amp-lightbox> |
رویداد موجود در amp-selector انتخاب شده است.
مثال
|
1 2 3 4 5 6 7 8 9 10 11 12 13 14 15 16 17 18 19 20 21 22 23 24 25 26 27 28 29 30 31 32 33 34 35 36 37 38 39 40 41 42 43 44 45 46 47 48 49 50 51 52 53 54 55 56 57 58 59 60 61 62 63 64 65 66 67 68 69 70 71 72 73 74 75 76 77 78 79 80 81 82 83 84 85 86 87 88 89 90 91 92 93 94 95 96 97 98 99 100 101 102 103 104 105 106 107 108 |
<!doctype html> <html amp lang = "en"> <head> <meta charset = "utf-8"> <script async src = "https://cdn.ampproject.org/v0.js"></script> <title>Google AMP - Amp Selector</title> <link rel = "canonical" href = "http://example.ampproject.org/article-metadata.html"> <meta name = "viewport" content = "width = device-width,minimum-scale = 1,initial-scale = 1"> <style amp-boilerplate> body{ -webkit-animation: -amp-start 8s steps(1,end) 0s 1 normal both;-moz-animation: -amp-start 8s steps(1,end) 0s 1 normal both;-ms-animation: -amp-start 8s steps(1,end) 0s 1 normal both;animation: -amp-start 8s steps(1,end) 0s 1 normal both } @-webkit-keyframes -amp-start{from{visibility:hidden}to{visibility:visible}}@-moz-keyframes -amp-start{from{visibility:hidden}to{visibility:visible}}@-ms-keyframes -amp-start{from{visibility:hidden}to{visibility:visible}}@-o-keyframes -amp-start{from{visibility:hidden}to{visibility:visible}}@keyframes -amp-start{from{visibility:hidden}to{visibility:visible}} </style> <noscript> <style amp-boilerplate> body { -webkit-animation:none; -moz-animation:none; -ms-animation:none; animation:none } </style> </noscript> <script async custom-element = "amp-bind" src = "https://cdn.ampproject.org/v0/amp-bind-0.1.js"> </script> <script async custom-element = "amp-selector" src = "https://cdn.ampproject.org/v0/amp-selector-0.1.js"> </script> <style amp-custom> .radio-menu { list-style: none; } .radio-menu [option][selected] { outline: none; } .radio-menu [option] { display: flex; align-items: center; } .radio-menu [option]:before { transition: background 0.25s ease-in-out; content: ""; display: inline-block; width: 24px; height: 24px; margin: 8px; border-radius: 100%; border: solid 1px black; } .radio-menu [option = red][selected]:before { text-align: center; content: "✓"; color: white; background: red; } .radio-menu [option = green][selected]:before { text-align: center; content: "✓"; color: white; background: green; } .radio-menu [option = blue][selected]:before { text-align: center; content: "✓"; color: white; background: blue; } p{font-size:30px;} </style> </head> <body> <h3>Google AMP - Amp Selector</h3> <p [text] = "'Color selected is ' + ampselectorstatus + '.'"> Amp Selector Event Testing <p> <amp-selector class = "radio-menu" layout = "container" name = "my-selector" on = "select:AMP.setState({ampselectorstatus:event.selectedOptions})"> <div option = "red"> Red </div> <div option = "green"> Green </div> <div option = "blue"> Blue </div> </amp-selector> </body> </html> |
خروجی
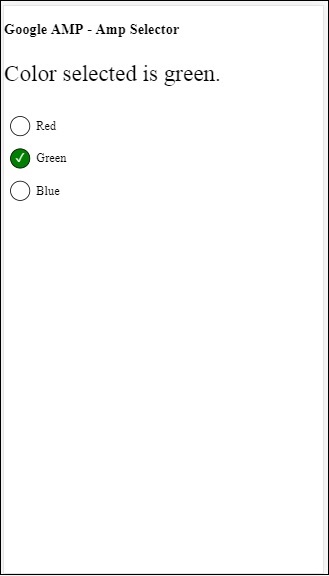
انتخاب رویداد به شرح زیر استفاده می شود –
|
1 2 3 4 5 6 7 8 9 10 11 12 13 14 15 16 17 18 |
<p [text]="'Color selected is ' + ampselectorstatus + '.'"> Amp Selector Event Testing </p> <amp-selector class = "radio-menu" layout ="container" name =" my-selector" on = "select:AMP.setState({ampselectorstatus:event.selectedOptions})"> <div option = "red"> Red </div> <div option = "green"> Green </div> <div option = "blue"> Blue </div> </amp-selector> |
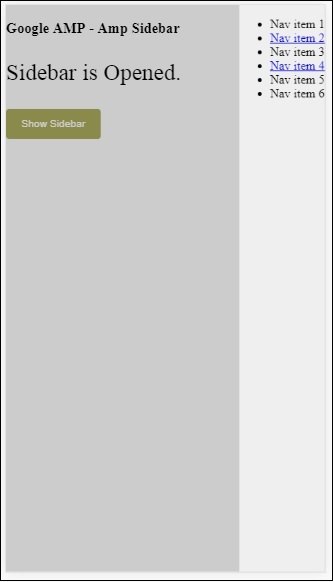
رویداد در Amp-Sidebar
رویدادهای موجود sidebarOpen و sidebarClose است.
مثال
|
1 2 3 4 5 6 7 8 9 10 11 12 13 14 15 16 17 18 19 20 21 22 23 24 25 26 27 28 29 30 31 32 33 34 35 36 37 38 39 40 41 42 43 44 45 46 47 48 49 50 51 52 53 54 55 56 57 58 59 60 61 62 63 64 65 66 67 68 69 70 71 72 73 74 75 76 77 78 79 80 81 82 83 84 85 86 87 88 89 90 91 92 93 |
<!doctype html> <html amp lang = "en"> <head> <meta charset = "utf-8"> <script async src = "https://cdn.ampproject.org/v0.js"></script> <title>Google AMP - Amp Sidebar</title> <link rel = "canonical" href = "http://example.ampproject.org/article-metadata.html"> <meta name = "viewport" content = "width = device-width,minimum-scale = 1,initial-scale = 1"> <style amp-boilerplate> body{ -webkit-animation: -amp-start 8s steps(1,end) 0s 1 normal both;-moz-animation: -amp-start 8s steps(1,end) 0s 1 normal both;-ms-animation: -amp-start 8s steps(1,end) 0s 1 normal both;animation: -amp-start 8s steps(1,end) 0s 1 normal both } @-webkit-keyframes -amp-start{from{visibility:hidden}to{visibility:visible}}@-moz-keyframes -amp-start{from{visibility:hidden}to{visibility:visible}}@-ms-keyframes -amp-start{from{visibility:hidden}to{visibility:visible}}@-o-keyframes -amp-start{from{visibility:hidden}to{visibility:visible}}@keyframes -amp-start{from{visibility:hidden}to{visibility:visible}} </style> <noscript> <style amp-boilerplate> body{ -webkit-animation:none; -moz-animation:none; -ms-animation:none; animation:none } </style> </noscript> <script async custom-element = "amp-bind" src = "https://cdn.ampproject.org/v0/amp-bind-0.1.js"> </script> <script async custom-element = "amp-sidebar" src = "https://cdn.ampproject.org/v0/amp-sidebar-0.1.js"> </script> <style amp-custom> amp-img { border: 1px solid #ddd; border-radius: 4px; padding: 5px; } button{ background-color: #ACAD5C; color: white; padding: 12px 20px; border: none; border-radius: 4px; cursor: pointer; float: left; } .amp-sidebar-toolbar-target-shown { display: none; } p{font-size:30px;} </style> </head> <body> <h3>Google AMP - Amp Sidebar</h3> <p [text] = "'Sidebar is ' + ampsidebarstatus + '.'"> Amp Sidebar Event Testing </p> <button on = "tap:sidebar1"> Show Sidebar </button> <amp-sidebar id = "sidebar1" layout = "nodisplay" side = "right" on = "sidebarOpen:AMP.setState({ampsidebarstatus: 'Opened'}); sidebarClose:AMP.setState({ampsidebarstatus: 'Closed'})"> <ul> <li>Nav item 1</li> <li> <a href = "#idTwo" on = "tap:idTwo.scrollTo">Nav item 2</a> </li> <li>Nav item 3</li> <li> <a href = "#idFour" on="tap:idFour.scrollTo">Nav item 4</a> </li> <li>Nav item 5</li> <li>Nav item 6</li> </ul> </amp-sidebar> <div id = "target-element"> </div> </body> </html> |
خروجی
لیست جلسات قبل آموزش گوگل AMP
- آموزش گوگل AMP
- بررسی اجمالی گوگل AMP
- مقدمه گوگل AMP
- آموزش تصاویر در گوگل AMP
- آموزش فرم در گوگل AMP
- آموزش Iframes در گوگل AMP
- آموزش ویدیو در گوگل AMP
- آموزش دکمه در گوگل AMP
- آموزش Timeago در گوگل AMP
- آموزش Mathml در گوگل AMP
- آموزش تگ Fit Text در گوگل AMP
- آموزش شمارش معکوس تاریخ در گوگل AMP
- آموزش انتخاب کننده تاریخ در گوگل AMP
- آموزش استوری در گوگل AMP
- آموزش انتخاب کننده در گوگل AMP
- آموزش لینک در گوگل AMP
- آموزش فونت در گوگل AMP
- آموزش لیست در گوگل AMP
- آموزش اعلان کاربر در گوگل AMP
- آموزش next page در گوگل AMP
- آموزش ویژگی ها در گوگل AMP
- آموزش استایل ها و CSS سفارشی در گوگل AMP
- آموزش کلاس های CSS پویا در گوگل AMP
- آموزش اکشن ها و رویدادها در گوگل AMP
- آموزش انیمیشن در گوگل AMP
- آموزش اتصال داده در گوگل AMP
- آموزش طرح بندی در گوگل AMP
- آموزش تبلیغات در گوگل AMP
- آموزش تجزیه و تحلیل در گوگل AMP
- آموزش ویجت های اجتماعی در گوگل AMP
- آموزش نحو در گوگل AMP
- آموزش اعتبار سنجی در گوگل AMP
- آموزش اجزا جاوا اسکریپت در گوگل AMP


.svg)
دیدگاه شما