
آموزش انیمیشن در گوگل AMP
آموزش انیمیشن در گوگل AMP
در این درس از مجموعه آموزش برنامه نویسی سایت سورس باران، به آموزش انیمیشن در گوگل AMP خواهیم پرداخت.
Amp-animation یک مولفه amp است که انیمیشن ها را برای استفاده در مولفه های دیگر amp تعریف می کند. در این درس به طور مفصل درباره آنها بحث شده است.
برای کار با انیمیشن، باید اسکریپت زیر را اضافه کنیم –
|
1 2 3 |
<script async custom-element = "amp-animation" src = "https://cdn.ampproject.org/v0/amp-animation-0.1.js"> </script> |
جزئیات انیمیشن در داخل ساختار json تعریف شده است.
ساختار اصلی Amp-animation همانطور که در اینجا نشان داده شده است –
|
1 2 3 4 5 6 7 8 9 10 11 12 13 14 15 16 17 |
<amp-animation layout = "nodisplay"> <script type = "application/json"> { // Timing properties ... "animations": [ { // animation 1 }, ... { // animation n } ] } </script> </amp-animation> |
مولفه انیمیشن شامل موارد زیر است – انتخابگرها ، متغیرها ، ویژگی های زمان بندی ، فریم های کلیدی و غیره
|
1 2 3 4 5 6 7 8 |
{ "selector": "#target-id", // Variables // Timing properties // Subtargets ... "keyframes": [] } |
انتخابگر
در اینجا باید کلاس یا شناسه عنصری را که روی آن انیمیشن استفاده می شود ، ارائه دهیم.
متغیرها
آنها مقادیری هستند که برای استفاده در داخل فریم های کلیدی تعریف شده اند. متغیرها با استفاده از ()var تعریف می شوند.
مثال
|
1 2 3 4 5 6 7 8 9 10 11 12 13 14 |
{ "--delay": "0.5s", "animations": [ { "selector": "#target1", "delay": "var(--delay)", "--x": "150px", "--y" : "200px", "keyframes": { "transform": "translate(var(--x), var(--y, 0px)" } } ] } |
در اینجا تأخیر ، x و y متغیر هستند و مقادیر متغیرها در مثال نشان داده شده تعریف شده است.
زمان بندی
در اینجا می توانید مدت و تأخیر انیمیشن خود را تعریف کنید. در زیر ویژگی های زمان پشتیبانی شده است –
| ویژگی | مقدار | توضیح |
|---|---|---|
| duration | Time property.Value has to be in milliseconds. | مدت زمانی که برای انیمیشن استفاده می شود. |
| delay | Time property.Value has to be in milliseconds. | تأخیر قبل از شروع انیمیشن شروع می شود |
| endDelay | Time property.Value has to be in milliseconds or seconds. | تأخیری که با اتمام انیمیشن اعمال می شود. |
| iterations | Value has to be a number. | تعداد دفعات تکرار انیمیشن. |
| iterationStart | Value has to be a number. | زمانی که اثر شروع به تحریک می کند |
| easing | Value is a string | این برای دستیابی به اثر انیمیشن مورد استفاده قرار می گیرد. برخی از مثالها, ease, ease-in, ease-out , ease-in-out etc |
| direction | Value is a string | مقدار یک رشته است از “عادی” ، “معکوس” ، “جایگزین” یا “متناوب-معکوس”. |
| fill | Value is a string | مقدار یک رشته است از “عادی” ، “معکوس” ، “جایگزین” یا “متناوب-معکوس”. |
فریم های کلیدی
فریم های کلیدی را می توان از بسیاری جهات مانند شکل اشیا یا فرم آرایه تعریف کرد. مثالهای زیر را در نظر بگیرید.
مثال
|
1 |
"keyframes": {"transform": "translate(100px,200px)"} |
مثال
|
1 2 3 4 5 6 7 |
{ "keyframes": { "opacity": [1, 0], "transform": ["scale(1)", "scale(2)"] } } |
مثال
|
1 2 3 4 5 6 |
{ "keyframes": [ {"opacity": 1, "transform": "scale(1)"}, {"opacity": 0, "transform": "scale(2)"} ] } |
مثال
|
1 2 3 4 5 6 |
{ "keyframes": [ {"easing": "ease-out", "opacity": 1, "transform": "scale(1)"}, {"opacity": 0, "transform": "scale(2)"} ] } |
کاربرد فریم های کلیدی در CSS
|
1 2 3 4 5 6 7 8 9 10 11 12 13 14 15 16 17 18 19 20 21 22 23 24 |
<style amp-custom> div { width: 100px; height: 100px; background-color: red; position: relative; margin: 0 auto; transform:scale(3); } @keyframes example { 0% {transform:scale(3)} 75% {transform:scale(2)} 100% {transform:scale(1)} } </style> <amp-animation layout = "nodisplay"> <script type = "application/json"> { "duration": "4s", "keyframes": "example" } </script> </amp-animation> |
برخی از ویژگی های CSS وجود دارد که می تواند در داخل فریم های کلیدی مورد استفاده قرار گیرد. به موارد پشتیبانی شده ، ویژگی های لیست سفید گفته می شود. موارد زیر ویژگی های لیست سفید هستند که می توانند در داخل فریم های کلیدی استفاده شوند –
- opacity
- transform
- visibility
- ‘offsetDistance’
توجه – استفاده از هر ویژگی دیگری به غیر از موارد سفید ذکر شده خطا در کنسول ایجاد می کند.
حال اجازه دهید ما از طریق یک مثال ساده درک کنیم که وقتی انیمیشن روی آن اعمال می شود ، تصویر را می چرخاند. در این مثال ، ما با استفاده از amp-animation تصویر را می چرخانیم.
مثال
|
1 2 3 4 5 6 7 8 9 10 11 12 13 14 15 16 17 18 19 20 21 22 23 24 25 26 27 28 29 30 31 32 33 34 35 36 37 38 39 40 41 42 43 44 45 46 47 48 49 50 51 52 53 54 55 56 57 58 59 60 61 62 63 64 65 66 67 68 69 70 71 72 73 74 75 76 77 78 79 |
<!doctype html> <html amp lang = "en"> <head> <meta charset = "utf-8"> <script async src = "https://cdn.ampproject.org/v0.js"></script> <title>Google AMP - Amp Video</title> <link rel = "canonical" href = "http://example.ampproject.org/article-metadata.html"> <meta name = "viewport" content = "width = device-width, minimum-scale = 1,initial-scale = 1"> <style amp-boilerplate> body{ -webkit-animation: -amp-start 8s steps(1,end) 0s 1 normal both;-moz-animation: -amp-start 8s steps(1,end) 0s 1 normal both;-ms -amp-start 8s steps(1,end) 0s 1 normal both;animation: -amp-start 8s steps(1,end) 0s 1 normal both } @-webkit-keyframes -amp-start{from{visibility:hidden}to{visibility:visible}}@-moz-keyframes -amp-start{from{visibility:hidden}to{visibility:visible}}@-ms-keyframes -amp-start{from{visibility:hidden}to{visibility:visible}}@-o-keyframes -amp-start{from{visibility:hidden}to{visibility:visible}}@keyframes -amp-start{from{visibility:hidden}to{visibility:visible}} </style> <noscript> <style amp-boilerplate> body{ -webkit-animation:none; -moz-animation:none; -ms-animation:none; animation:none } </style> </noscript> <script async custom-element = "amp-animation" src =" https://cdn.ampproject.org/v0/amp-animation-0.1.js"> </script> <style amp-custom> amp-img { border: 1px solid black; border-radius: 4px; padding: 5px; } </style> </head> <body> <h3>Google AMP - Amp Animation Example</h3> <amp-animation id = "anim1" layout = "nodisplay" trigger = "visibility"> <script type = "application/json"> { "duration": "1s", "fill": "both", "direction": "alternate", "animations": [ { "selector": "#image1", "easing": "cubic-bezier(0,0,.21,1)", "keyframes": { "transform": "rotate(20deg)" } } ] } </script> </amp-animation> <br/> <br/> <amp-img id = "image1" src = "images/christmas1.jpg" width = 300 height = 250 layout = "responsive"> </amp-img> <br/> </body> </html> |
خروجی

جزئیات جزئیات amp-animation مورد استفاده در بالا در کدی که در زیر نشان داده شده است آورده شده است –
|
1 2 3 4 5 6 7 8 9 10 11 12 13 14 15 16 17 18 |
<amp-animation id = "anim1" layout = "nodisplay" trigger = "visibility"> <script type = "application/json"> { "duration": "1s", "fill": "both", "direction": "alternate", "animations": [ { "selector": "#image1", "easing": "cubic-bezier(0,0,.21,1)", "keyframes": { "transform": "rotate(20deg)" } } ] } </script> </amp-animation> |
انتخابگر در اینجا شناسه تصویری است که انیمیشن چرخشی روی آن اعمال می شود –
|
1 2 3 4 5 6 7 |
<amp-img id = "image1" src = "images/christmas1.jpg" width = 300 height = 250 layout = "responsive"> </amp-img> |
مثال استفاده از Keyframes از CSS
|
1 2 3 4 5 6 7 8 9 10 11 12 13 14 15 16 17 18 19 20 21 22 23 24 25 26 27 28 29 30 31 32 33 34 35 36 37 38 39 40 41 42 43 44 45 46 47 48 49 50 51 52 53 54 55 56 57 58 59 60 61 62 63 64 65 66 67 68 69 70 71 72 73 74 75 |
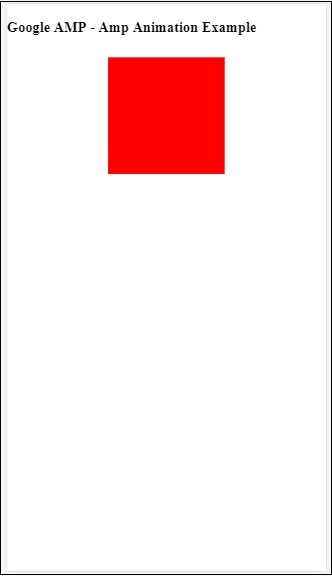
<!doctype html> <html amp lang = "en"> <head> <meta charset = "utf-8"> <script async src = "https://cdn.ampproject.org/v0.js"></script> <title>Google AMP - Amp Video</title> <link rel = "canonical" href = "http://example.ampproject.org/article-metadata.html"> <meta name = "viewport" content = "width = device-width,minimum-scale = 1,initial-scale = 1"> <style amp-boilerplate> body{ -webkit-animation: -amp-start 8s steps(1,end) 0s 1 normal both;-moz-animation: -amp-start 8s steps(1,end) 0s 1 normal both;-ms-animation: -amp-start 8s steps(1,end) 0s 1 normal both;animation: -amp-start 8s steps(1,end) 0s 1 normal both } @-webkit-keyframes -amp-start{from{visibility:hidden}to{visibility:visible}}@-moz-keyframes -amp-start{from{visibility:hidden}to{visibility:visible}}@-ms-keyframes -amp-start{from{visibility:hidden}to{visibility:visible}}@-o-keyframes -amp-start{from{visibility:hidden}to{visibility:visible}}@keyframes -amp-start{from{visibility:hidden}to{visibility:visible}} </style> <noscript> <style amp-boilerplate> body{ -webkit-animation:none; -moz-animation:none; -ms-animation:none; animation:none } </style> </noscript> <script async custom-element = "amp-animation" src = "https://cdn.ampproject.org/v0/amp-animation-0.1.js"> </script> <style amp-custom> div { width: 100px; height: 100px; background-color: red; position: relative; margin: 0 auto; transform:scale(3); } @keyframes example { 0% {transform:scale(3)} 75% {transform:scale(2)} 100% {transform:scale(1)} } </style> </head> <body> <h3>Google AMP - Amp Animation Example</h3> <amp-animation id = "anim1" layout = "nodisplay" trigger = "visibility"> <script type = "application/json"> { "duration": "3s", "fill": "both", "direction": "alternate", "animations": [{ "selector": "#image1", "easing": "cubic-bezier(0,0,.21,1)", "keyframes":"example" }] } </script> </amp-animation> <br/> <br/> <div id = "image1"></div> <br/> </body> </html> |
خروجی
شروع کننده انیمیشن
با “trigger = ”visibility، انیمیشن به طور پیش فرض اعمال می شود. برای شروع انیمیشن در یک رویداد ، باید “trigger = ”visibility را برداشته و رویداد را برای شروع انیمیشن اضافه کنیم همانطور که در مثال زیر نشان داده شده است –
مثال
|
1 2 3 4 5 6 7 8 9 10 11 12 13 14 15 16 17 18 19 20 21 22 23 24 25 26 27 28 29 30 31 32 33 34 35 36 37 38 39 40 41 42 43 44 45 46 47 48 49 50 51 52 53 54 55 56 57 58 59 60 61 62 63 64 65 66 67 68 69 70 71 72 73 74 75 76 77 78 79 80 81 82 83 |
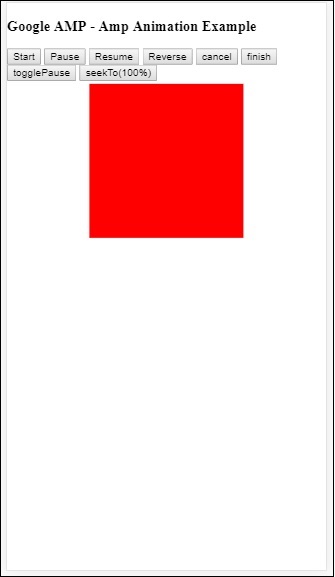
<!doctype html> <html amp lang = "en"> <head> <meta charset = "utf-8"> <script async src = "https://cdn.ampproject.org/v0.js"></script> <title>Google AMP - Amp Video</title> <link rel = "canonical" href = "http://example.ampproject.org/article-metadata.html"> <meta name = "viewport" content = "width = device-width, minimum-scale = 1,initial-scale = 1"> <style amp-boilerplate> body{ -webkit-animation: -amp-start 8s steps(1,end) 0s 1 normal both;-moz-animation: -amp-start 8s steps(1,end) 0s 1 normal both;-ms-animation: -amp-start 8s steps(1,end) 0s 1 normal both;animation: -amp-start 8s steps(1,end) 0s 1 normal both } @-webkit-keyframes -amp-start{from{visibility:hidden}to{visibility:visible}}@-moz-keyframes -amp-start{from{visibility:hidden}to{visibility:visible}}@-ms-keyframes -amp-start{from{visibility:hidden}to{visibility:visible}}@-o-keyframes -amp-start{from{visibility:hidden}to{visibility:visible}}@keyframes -amp-start{from{visibility:hidden}to{visibility:visible}} </style> <noscript> <style amp-boilerplate> body{ -webkit-animation:none; -moz-animation:none; -ms-animation:none; animation:none} </style> </noscript> <script async custom-element = "amp-animation" src = "https://cdn.ampproject.org/v0/amp-animation-0.1.js"> </script> <style amp-custom> div { width: 100px; height: 100px; background-color: red; position: relative; margin: 0 auto; transform:scale(2); } @keyframes example { 0% {transform:scale(2)} 75% {transform:scale(1)} 100% {transform:scale(0.5)} } button{ background-color: #ACAD5C; color: white; padding: 12px 20px; border: none; border-radius: 4px; cursor: pointer; float: left; } </style> </head> <body> <h3>Google AMP - Amp Animation Example</h3> <amp-animation id = "anim1" layout = "nodisplay"> <script type = "application/json"> { "duration": "3s", "fill": "both", "direction": "alternate", "animations": [{ "selector": "#image1", "easing": "cubic-bezier(0,0,.21,1)", "keyframes":"example" }] } </script> </amp-animation> <button on = "tap:anim1.start">Start</button> <br/> <br/> <div id = "image1"></div> </body> </html> |
خروجی

ما برای شروع با انیمیشن از عملی به نام start on On استفاده کرده ایم. به همین ترتیب ، اقدامات دیگری نیز پشتیبانی می شود که به شرح زیر است –
- start
- pause
- restart
- resume
- togglePause
- seekTo
- reverse
- finish
- cancel
بیایید یک مثال عملی ببینیم که در آن می توانیم از عمل استفاده کنیم.
مثال
|
1 2 3 4 5 6 7 8 9 10 11 12 13 14 15 16 17 18 19 20 21 22 23 24 25 26 27 28 29 30 31 32 33 34 35 36 37 38 39 40 41 42 43 44 45 46 47 48 49 50 51 52 53 54 55 56 57 58 59 60 61 62 63 64 65 66 67 68 69 70 71 72 73 74 75 76 77 78 79 80 81 82 83 84 85 86 87 88 89 90 91 92 93 |
<!doctype html> <html amp lang = "en"> <head> <meta charset = "utf-8"> <script async src = "https://cdn.ampproject.org/v0.js"></script> <title>Google AMP - Amp Video</title> <link rel = "canonical" href = "http://example.ampproject.org/article-metadata.html"> <meta name = "viewport" content = "width=device-width,minimum-scale = 1,initial-scale = 1"> <style amp-boilerplate> body{ -webkit-animation: -amp-start 8s steps(1,end) 0s 1 normal both;-moz-animation: -amp-start 8s steps(1,end) 0s 1 normal both;-ms-animation: -amp-start 8s steps(1,end) 0s 1 normal both;animation: -amp-start 8s steps(1,end) 0s 1 normal both } @-webkit-keyframes -amp-start{from{visibility:hidden}to{visibility:visible}}@-moz-keyframes -amp-start{from{visibility:hidden}to{visibility:visible}}@-ms-keyframes -amp-start{from{visibility:hidden}to{visibility:visible}}@-o-keyframes -amp-start{from{visibility:hidden}to{visibility:visible}}@keyframes -amp-start{from{visibility:hidden}to{visibility:visible}} </style> <noscript> <style amp-boilerplate> body{ -webkit-animation:none; -moz-animation:none; -ms-animation:none; animation:none} </style> </noscript> <script async custom-element = "amp-animation" src = "https://cdn.ampproject.org/v0/amp-animation-0.1.js"> </script> <style amp-custom> #image1 { width: 100px; height: 100px; background-color: red; position: relative; margin: 0 auto; transform:scale(2); } @keyframes example { 0% {transform:scale(2)} 75% {transform:scale(1)} 100% {transform:scale(0.5)} } button1{ background-color: #ACAD5C; color: white; padding: 12px 20px; border: none; border-radius: 4px; cursor: pointer; float: left; } </style> </head> <body> <h3>Google AMP - Amp Animation Example</h3> <amp-animation id = "anim1" layout = "nodisplay"> <script type = "application/json"> { "duration": "3s", "fill": "both", "direction": "alternate", "animations": [{ "selector": "#image1", "easing": "cubic-bezier(0,0,.21,1)", "keyframes":"example" }] } </script> </amp-animation> <button on = "tap:anim1.start">Start</button> <button on = "tap:anim1.pause">Pause</button> <button on = "tap:anim1.resume">Resume</button> <button on = "tap:anim1.reverse">Reverse</button> <button on = "tap:anim1.cancel">cancel</button> <button on = "tap:anim1.finish">finish</button> <button on = "tap:anim1.togglePause">togglePause</button> <button on = "tap:anim1.seekTo(percent = 1.00)">seekTo(100%)</button> <br/> <br/> <br/> <br/> <div id="image1"></div> </body> </html> |
خروجی
لیست جلسات قبل آموزش گوگل AMP
- آموزش گوگل AMP
- بررسی اجمالی گوگل AMP
- مقدمه گوگل AMP
- آموزش تصاویر در گوگل AMP
- آموزش فرم در گوگل AMP
- آموزش Iframes در گوگل AMP
- آموزش ویدیو در گوگل AMP
- آموزش دکمه در گوگل AMP
- آموزش Timeago در گوگل AMP
- آموزش Mathml در گوگل AMP
- آموزش تگ Fit Text در گوگل AMP
- آموزش شمارش معکوس تاریخ در گوگل AMP
- آموزش انتخاب کننده تاریخ در گوگل AMP
- آموزش استوری در گوگل AMP
- آموزش انتخاب کننده در گوگل AMP
- آموزش لینک در گوگل AMP
- آموزش فونت در گوگل AMP
- آموزش لیست در گوگل AMP
- آموزش اعلان کاربر در گوگل AMP
- آموزش next page در گوگل AMP
- آموزش ویژگی ها در گوگل AMP
- آموزش استایل ها و CSS سفارشی در گوگل AMP
- آموزش کلاس های CSS پویا در گوگل AMP
- آموزش اکشن ها و رویدادها در گوگل AMP
- آموزش انیمیشن در گوگل AMP
- آموزش اتصال داده در گوگل AMP
- آموزش طرح بندی در گوگل AMP
- آموزش تبلیغات در گوگل AMP
- آموزش تجزیه و تحلیل در گوگل AMP
- آموزش ویجت های اجتماعی در گوگل AMP
- آموزش نحو در گوگل AMP
- آموزش اعتبار سنجی در گوگل AMP
- آموزش اجزا جاوا اسکریپت در گوگل AMP


.svg)
دیدگاه شما